DIY Cold Plunge
Earlier this year, I designed and built a cold plunge. Including prep and drying off, I can do a 5 minute plunge in about 10 minutes, making it easy enough to do every day. If you're interested in having one, here's a guide about what exists and how to build your own.
If you would like to know why you'd want to get into cold water regularly, I won't pitch you too hard — instead, try it. I have no idea if it's a health panacea (some act like it, some are mixed). It feels great, makes me feel energized for hours after, and gives an "easy" mental repetition for doing hard things. And regularly doing hard things is great.
At home cold plunge approaches
The simplest and cheapest route is to use an existing tub or shower. Depending on time of year and where you live, the cold tap water may be sufficient to get started. Eventually, you'll probably want to add ice to get the water colder. If this is your first cold water exposure, I suggest trying a water temperature of around 55°F initially. Reusable ice packs do not work well — they retain cold too much, and the tub heats faster than they can effectively cool it off. Store-bought ice bags work, but end up being pretty expensive. Making your own large ice blocks using aluminum catering trays in the freezer is effective, but they also melt fairly slowly, and most people don't have that much empty freezer space.
Once you're tired of managing ice, it's time to go bigger. No matter your approach, you should think about a few things:
- Water chilling. How will the water get and remain cold? How cold do you need it?
- Filtering and sanitization. Without anything, your water will get quite nasty within a few days. How will you filter large particles and sanitize unwanted algae and bacteria growth?
- The basin. What will you get into? Is it large enough? Will you solve for insulation? Will you have a lid?
There's a few options that are popular, and it can be overwhelming to decide what's best. Here's what I learned:
Chest freezer conversions
This is overall the cheapest that includes chilling. However, because it's all-in-one, if anything breaks, you'll probably need to replace the whole thing. Chest freezer compressors are fairly undersized and weren't designed to chill 100 gallons all the time, so you'll be putting a lot of load on it. I'm aware of no chest freezers that are actually water tight — you'll have to manually seal a lot of seams with a product like JB Weld Water Weld, which is a long process. And then people often use pond liners to make sure it stays waterproof.
Additionally, this approach also doesn't offer any built-in filtering and sanitization options, so you'll need to solve that separately. However, overall, this approach certainly works and many people have conversions that have lasted a few years. This is the best guide I've found.
Ice barrels / inflatable tubs / stock tanks
These don't solve chilling or sanitization for you, but are simple. They range from quite inexpensive to unusually premium (for what you get). These are basically the same as using your tub, since you'll need to manage ice and replace the water often. Since I wanted something I could use easily every day, these didn't make much sense. However, it is possible to hook up a chiller/filter/pump — my main concern is that they can't keep heat out nearly as well as my preferred solution.
An interesting hybrid solution is inflatable tubs, made from the same material as rafts. They are significantly cheaper than what I built, both because they can be constructed more simply and can be shipped deflated. They are not insulated, though, besides the air gap between the layers. One of the things I wanted to optimize for with my build was heat (cold) retention, and I wasn't sure how well these would work.
You're in luck: over the summer and fall of 2024, I did extensive temperature testing, comparing a premium inflatable cold plunge basin and my cooler-based build, and shared all the data below.
Many people use stock tanks. I don't think these are any better than the cheaper tubs you can get online, include no lid, and are horribly insulated. Think about it: metal stock tanks are basically heat sinks. This makes their total operating cost significantly higher unless you insulate them well. This YouTube channel has videos about building a stock tank with water chiller / pump / filter setup.
A reader who started with a stock tank build shared some cooling data:
Before switching to a cooler like you recommended, I used a stock tank. It worked, but I needed a 1hp chiller that ran almost all the time in the summer. I tried insulating it, which helped, but never got to where the energy draw wasn't significant. With the cooler setup, it runs for less than an hour per day.
Readily-made cold plunges
There's tons on the market. The Cold Plunge ($5000), Odin Ice Bath ($6900), Polar Monkeys ($2800), ModPlunge ($3000), and more. The price range buys different (better?) design and different (better?) chillers, but not much else.
If you have the budget and want low-effort, this is probably the way to go.
DIY approach: a huge insulated cooler and water chiller
This is what I built. Initially, it's not as cheap as others (except ready-made options, above), but you may come out ahead with less energy use. A well-designed cooler solves insulation, which lowers operating cost significantly, and comes water-tight with a well-fitting lid and drainage hole. This build also let me chose all the other components. Overall, it's about $1300 cheaper than I could buy pre-made.
Additionally, buying the cooler first lets you have an ultra-insulated tub that you can use ice with until you decide to build the rest. It's around the same cost as the Ice Barrel mentioned above, but better in almost every way.
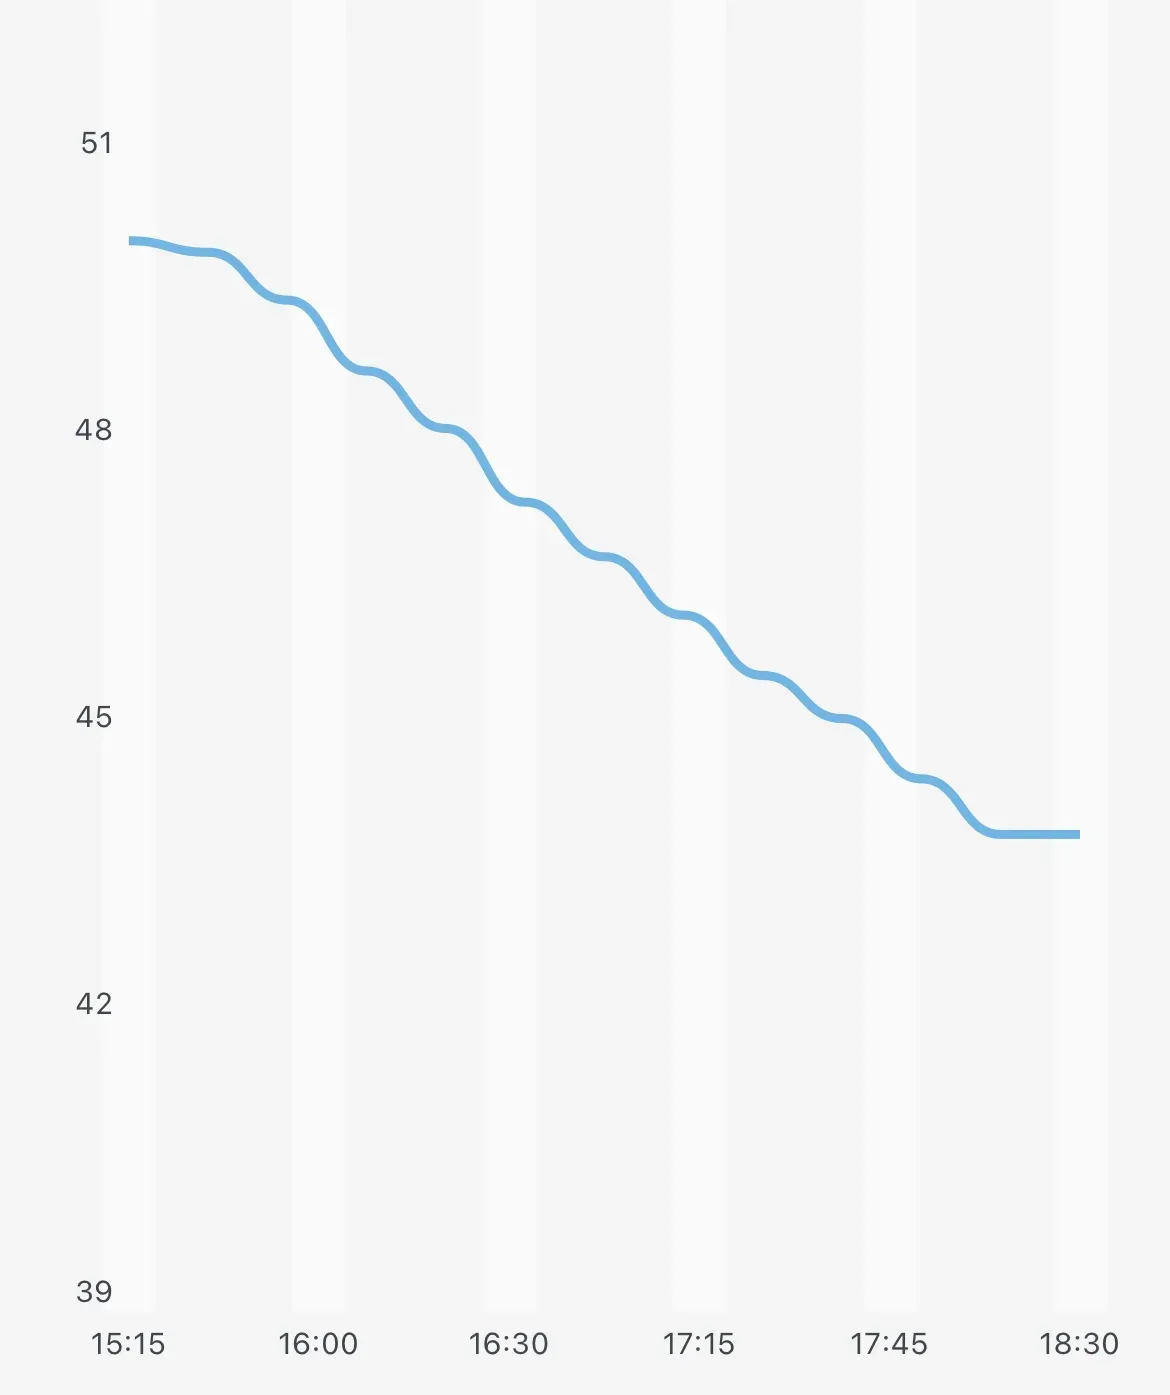
My setup chills the water at roughly 2°F per hour. With water at 40°F and ambient air around 75°F, when the chiller and pump are off, the cooler's insulation is good enough to only lose roughly 1-2°F per day. It can get to 40°F without issue, which is my current operating temperature. If you're interested in cooling performance, I have detailed information below.
The build was quite fun, and I learned a lot. Let's get into it.
Building your own cold plunge
Here's what we're building:
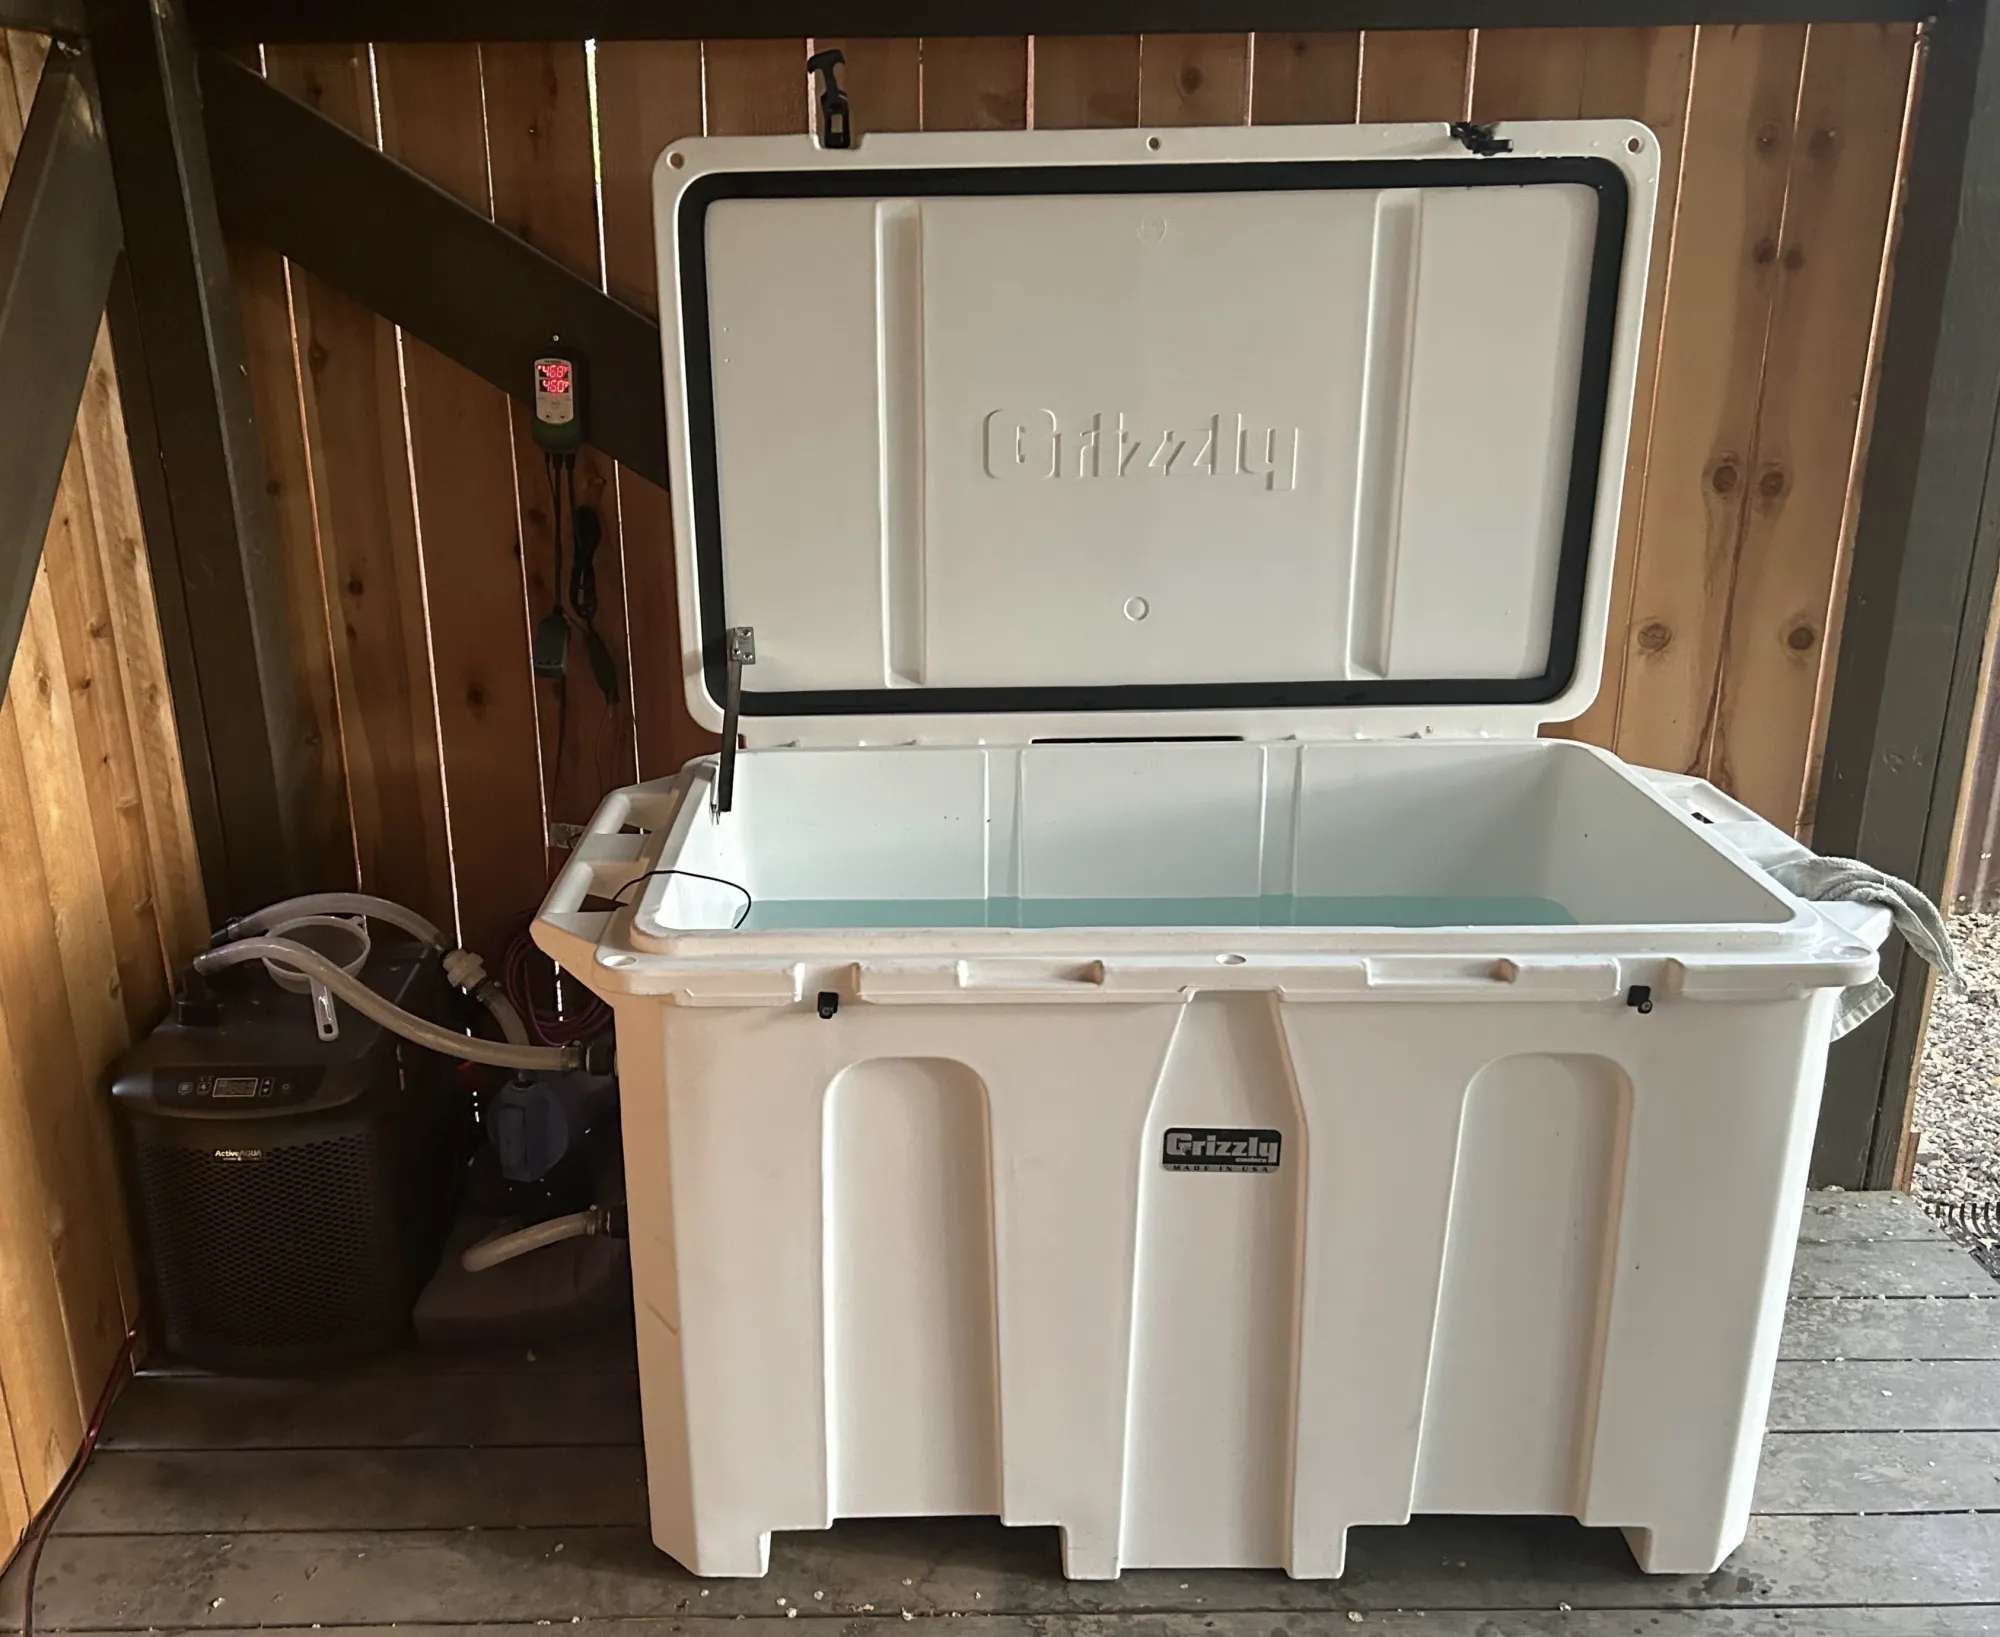
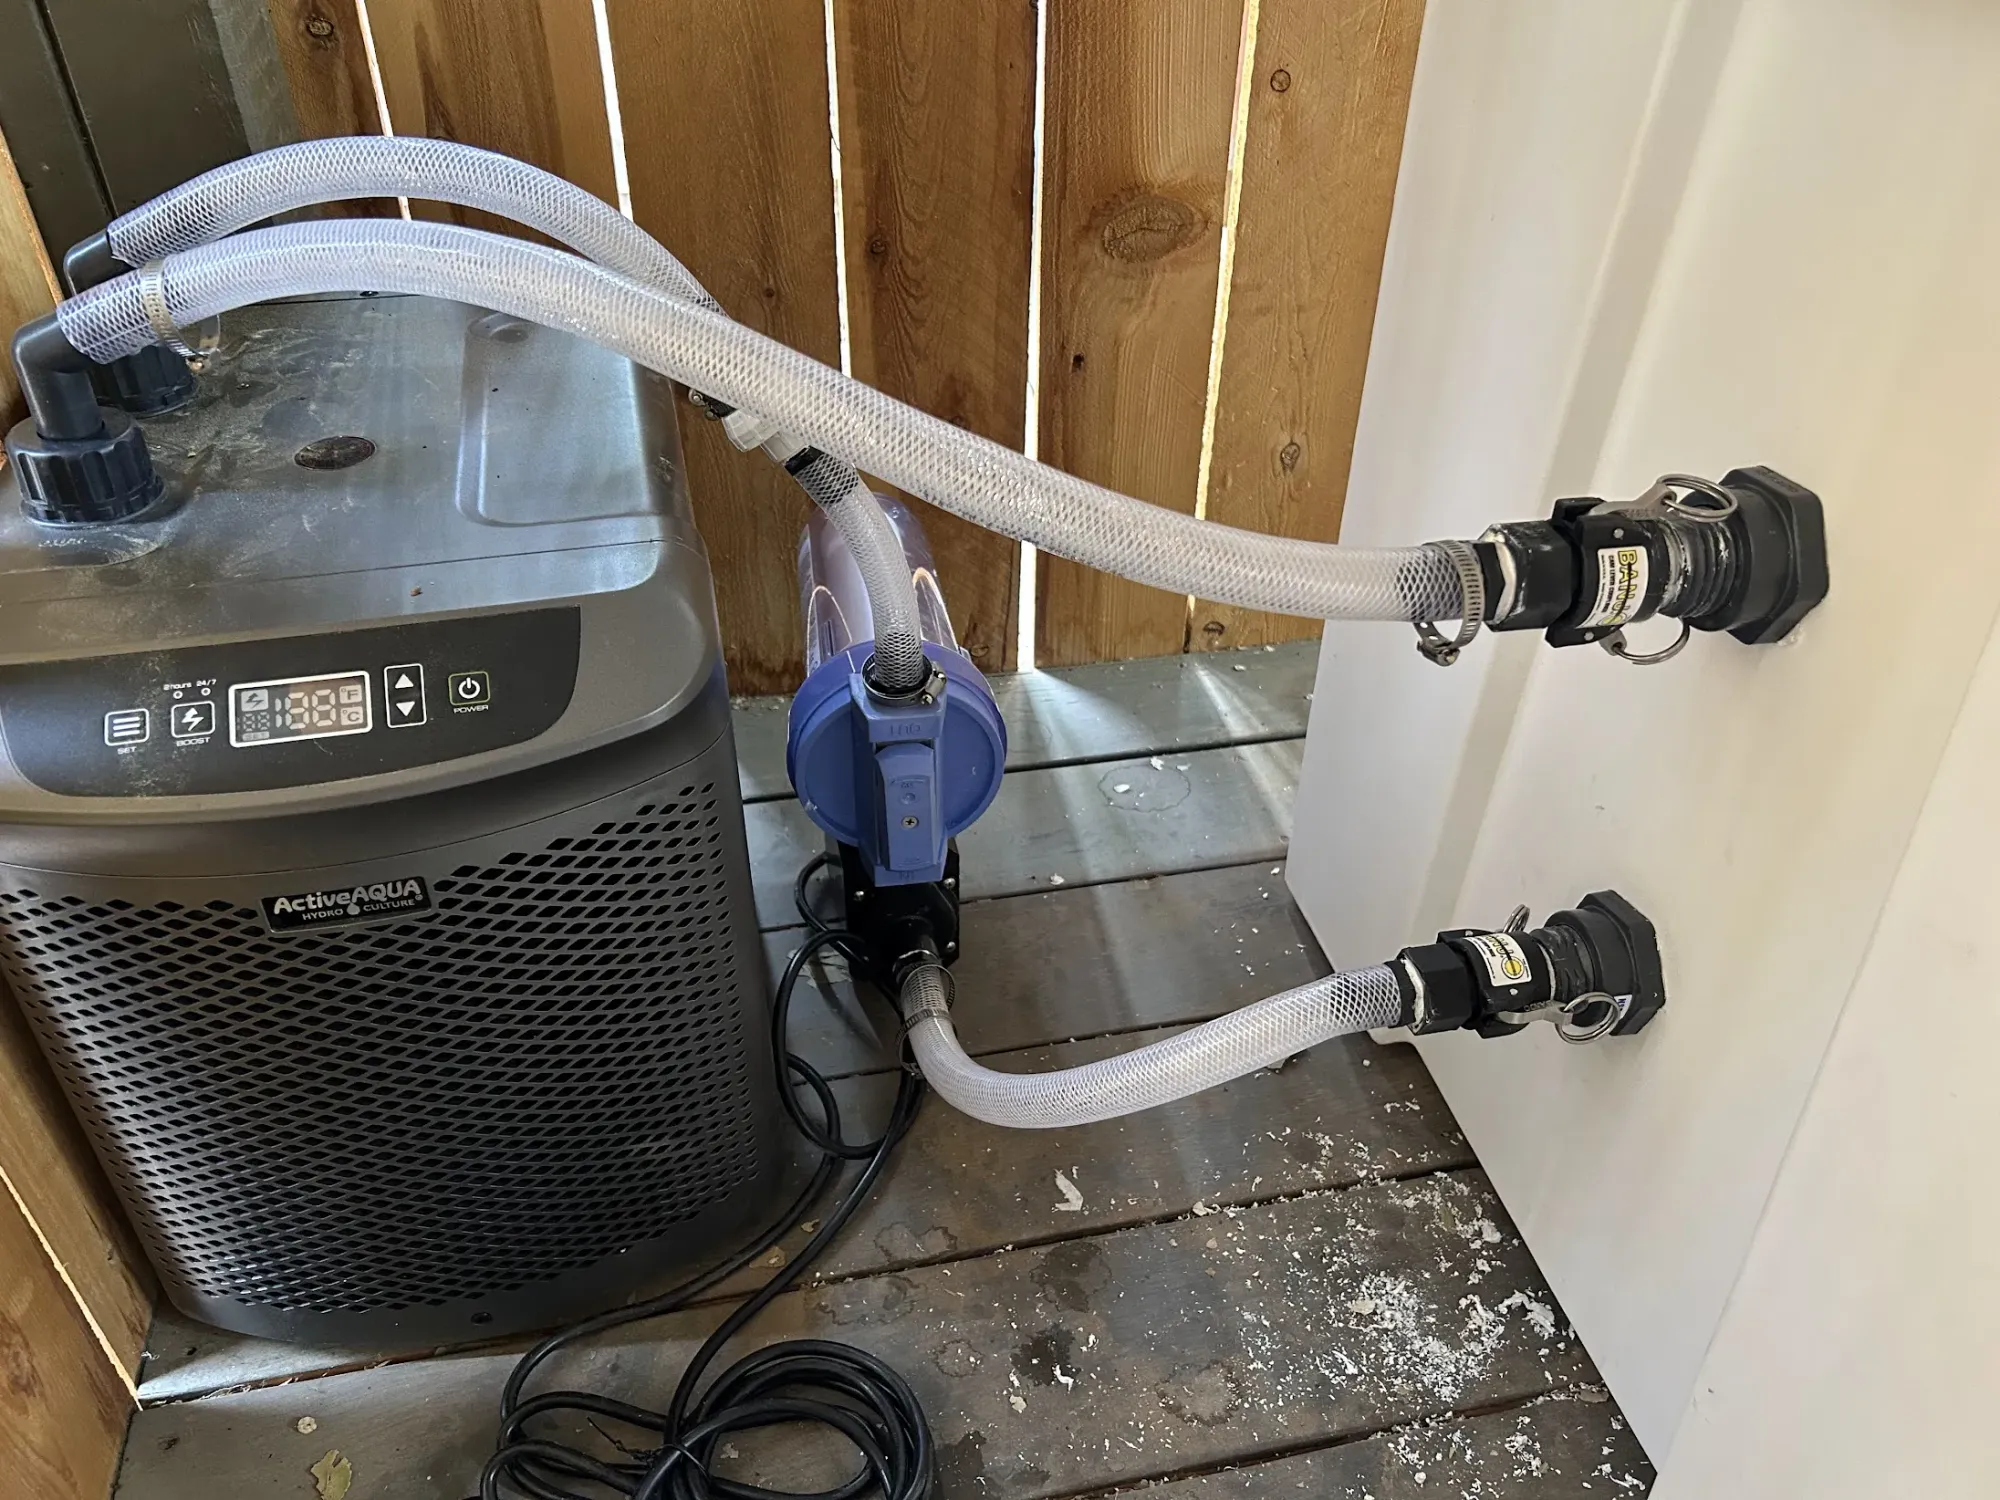
Water leaves the cooler, goes into the pump, then filter, then chiller, and back to the cooler. My design is more simple than others I found online, avoids gluing PVC, and is easily modifiable. All plumbing fittings are for 3/4 inch tubing, and all fittings use NPT threading (if you don't know what this is, don't worry — full parts list is below). My completed build was around $1700, most of which is the large cooler. You can follow this plan with a 100 gallon stock tank and save about $800, but you'll then need to separately think about insulation, which may end up costing any bit that you're saving.
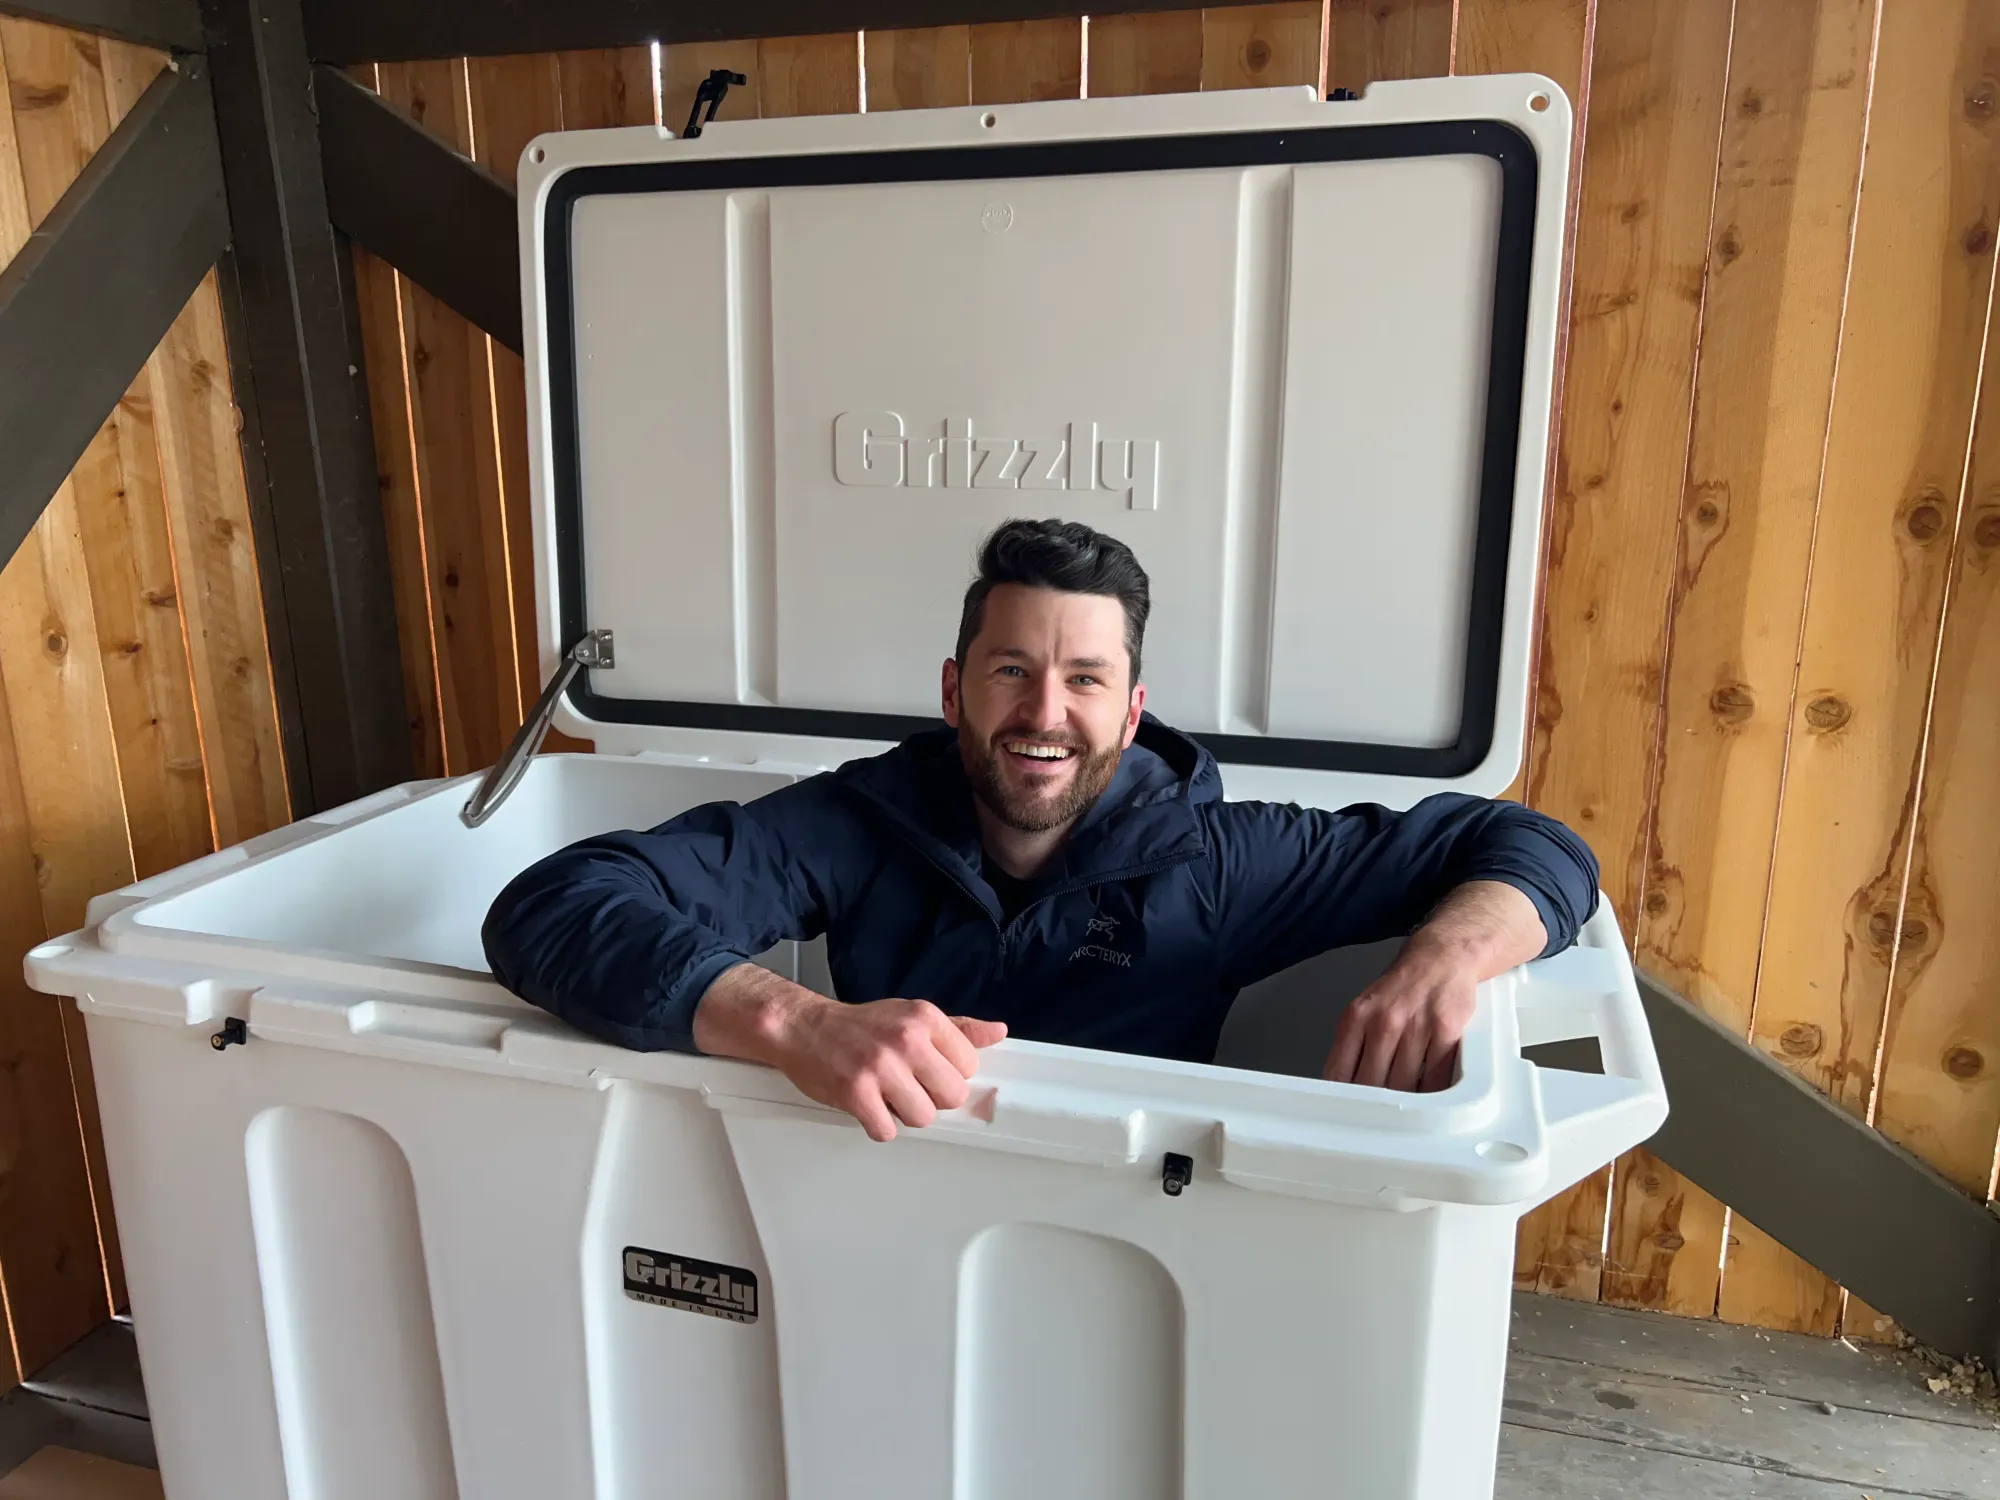
I use a Grizzly 400 cooler, which is 400 liters (105 gallons) and easily fits my 6'2" 180 lbs body. There's a few alternatives, such as the Yeti Tundra 350 liter cooler, but it's quite a bit more expensive. The Grizzly is built well, has a well-fitting lid, insulates very well, and has a locking lid feature. I wasn't able to find anything significantly cheaper that had the same features. As of the spring of 2024, Grizzly stopped making the 400 series cooler, and instead has a 450 quart version. Unfortunately, it's slightly more expensive than the 400 quart version was, but I would still use this over alternatives.
The core benefit of these, as I mentioned, is how incredibly energy efficient they are. This isn't a minor detail, which unfortunately many vendors miss. Cooling 80-100 gallons takes a lot of energy, and any heat that's absorbed from the environment directly increases energy costs.
A reader tried this 400 quart insulated tub and kindly sent temperature information. In short, it works better than other non-insulated alternatives, but not as well as the Grizzly. Depending on your climate, for the price ($300 cheaper and free shipping), it may be a worthwhile tradeoff.
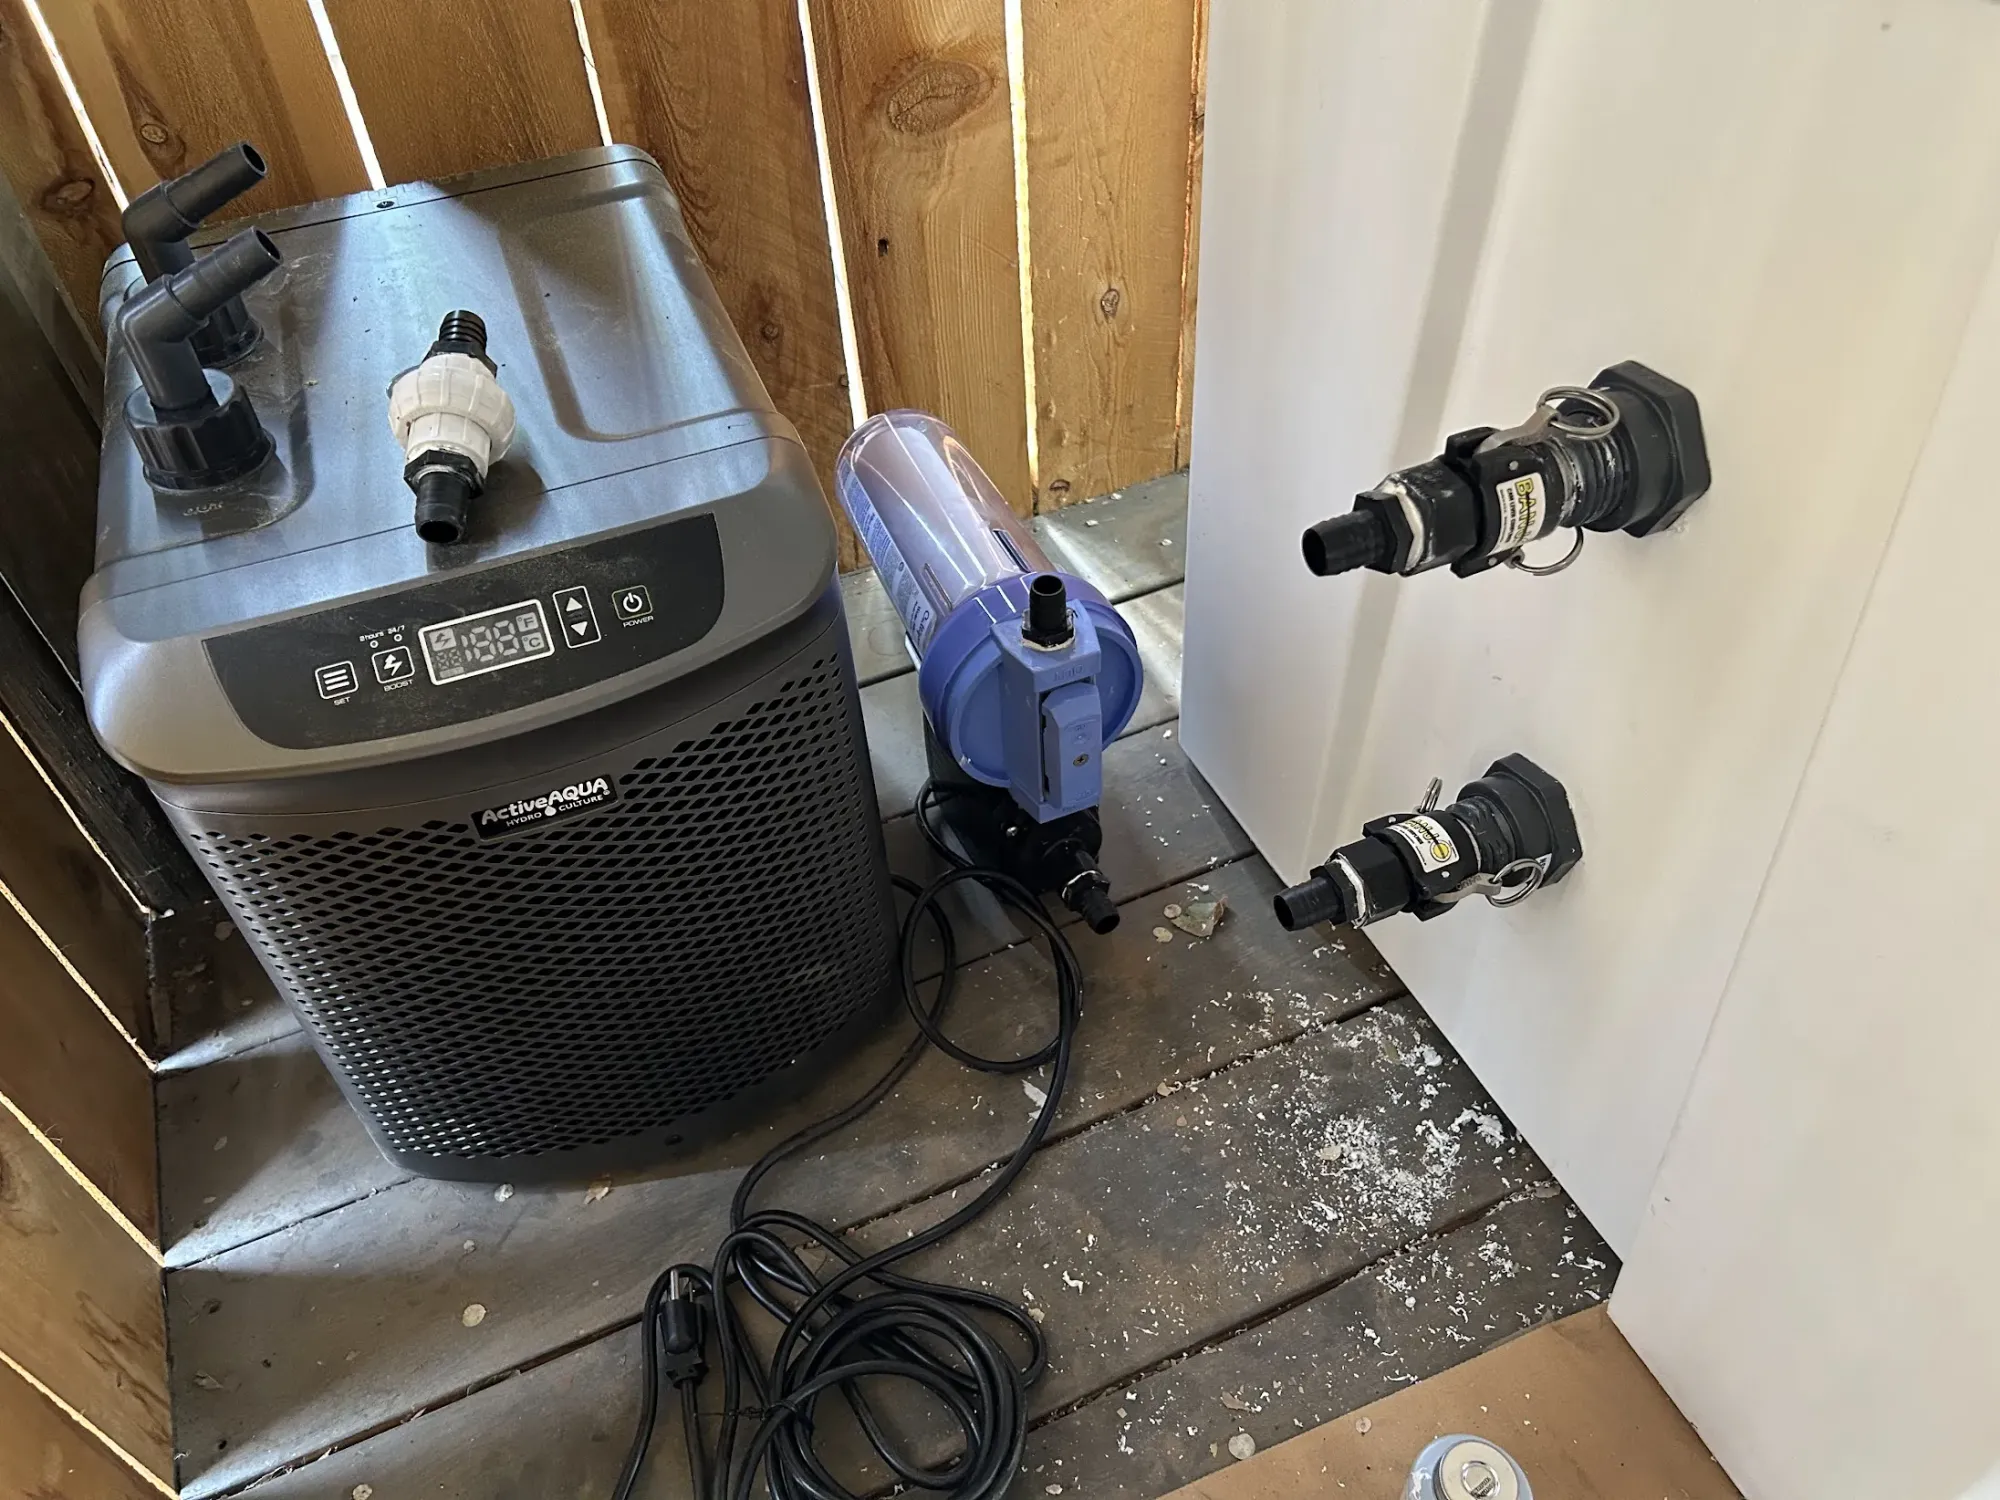
There's several popular chillers people use. Active Aqua and Penguin both make good chillers that are appropriately sized. The most common power for cold plunge chillers is 1/2 HP, but since the cooler insulates so well, unless you leave the lid open a lot, you don't need that much power. For the cost, the Active Aqua 1/4 HP model seemed the best to me. If you use a stock tank, you'll need at least the 1/2 HP model, and perhaps the 1 HP model, depending on how well you insulate the top and what your lid is.
Pumps are relatively cheap compared to the other big components, so I went with one that should be reliable for years: the Danner Mag-Drive. Danner makes several different flow rates. I chose the Model 12, which outputs a peak flow of 1200 gallons per hour. In practice, with all the resistance from the filter, fittings, and chiller, the flow is a good bit lower. I do think I oversized, and could have actually gone with the Model 7 (700 gallons per hour) without any issue.
Parts list
Here are the major components. Shop around to get a good deal.
- Grizzly 450 cooler. See the note above about the Grizzly 400, which was the initial recommendation. Shop around, you can sometimes get a good deal, but always available direct.
- Danner Mag-Drive pump. I chose a 1200 gallons per hour pump ($110 on Amazon), but many people have been happy with the 950 gallons per hour model ($90 on Amazon). I lean slightly towards the larger one so the flow rate is stronger. Don't get a cheap pump that will die on you.
- Culligan HF-360B whole house filter. It's better to go larger than smaller on a filter. $33 on Amazon. Here are the replacement filters that I use.
- Active Aqua 1/4 HP Chiller. This is smaller than chillers for many stock tank plans you may find online, because the cooler insulates so well. Frankly, for my climate, it may be overpowered, but the next smaller size is 1/10 HP (see notes below about sizing estimates). As of June 2024, Amazon has the 1/4 HP for less than $600.
Additionally, you'll need tubing and a few fittings. For my exact build, here's what I ordered:
- 10 feet × PVC Vinyl Flexible Tubing (Amazon). 10 feet should be enough if you have a compact layout like mine, but extra tube gives more flexibility. You can use any flexible tubing that's appropriate for water use outdoors. It's easiest to stick with 3/4 inch inner diameter since that's the size we'll use for all other parts.
- 2 × Thick-Wall Through-Wall Pipe Fitting bulkhead (McMaster-Carr #36895K112). This part goes through the holes in the cooler, creates a tight seal, and provides plumbing threads for you to screw in to. You may be able to find something cheaper, but this worked well for me. Make sure it allows for 2 inches of thickness.
- 4-6+ × Plastic Barbed Hose Fitting Adapter (McMaster-Carr #5218K712). Since these are cheap, I recommend that you get a few extra so you're able to change the design slightly if you want, such as not screwing the filter into the pump. Since I use one Union Straight Connector (below), I needed 6 total.
- 1 10-pack box × Worm-Drive Clamps For Firm Hose And Tub (McMaster-Carr #5388K24).
- 1 × Rectorseal T Plus 2 Pipe Thread Sealant (Amazon). This goes on all fitting threads to ensure a water-tight seal. You can use any thread sealant, but get one that does not harden so that you'll be able to unscrew fittings if you have to. Some people use Teflon tape, but in my experience, thread sealant (also called pipe dope) is far more effective.
- (optional) 2 × Plastic Cam-and-Groove Hose Couplings, male and female ends (McMaster-Carr #5535K56 and #5535K66). This allows you to easily connect and disconnect from the cooler. If you wish to semi-permanently attach a hose instead, get two extra Plastic Barbed Hose Fitting Adapters, instead.
- (optional) 1 or 2 × PVC Union Straight Connector (McMaster-Carr #4880K372). You can use these to be able to easily attach and detach tube sections from each other. You can skip this entirely, but having the ability to easily detach components without unfitting the barb fittings can be useful. Add two Plastic Barbed Hose Fitting Adapters for each union connector you add to your system.
- (optional) 2 × PVC On/Off Valve (McMaster-Carr #9848K41). This is only if you want to be able to disconnect everything cleanly with no leaks. I did not do this, but you may want this. Alternatively, you can use cheap rubber stoppers to plug the inlet/outlet ports on the bulkheads.
For tools, you'll need a flathead screwdriver to tighten the tube clamps, a 1-5/8 inch hole saw (Amazon) to cut holes in the side of the cooler, and a power drill.
Build process
Ordering parts
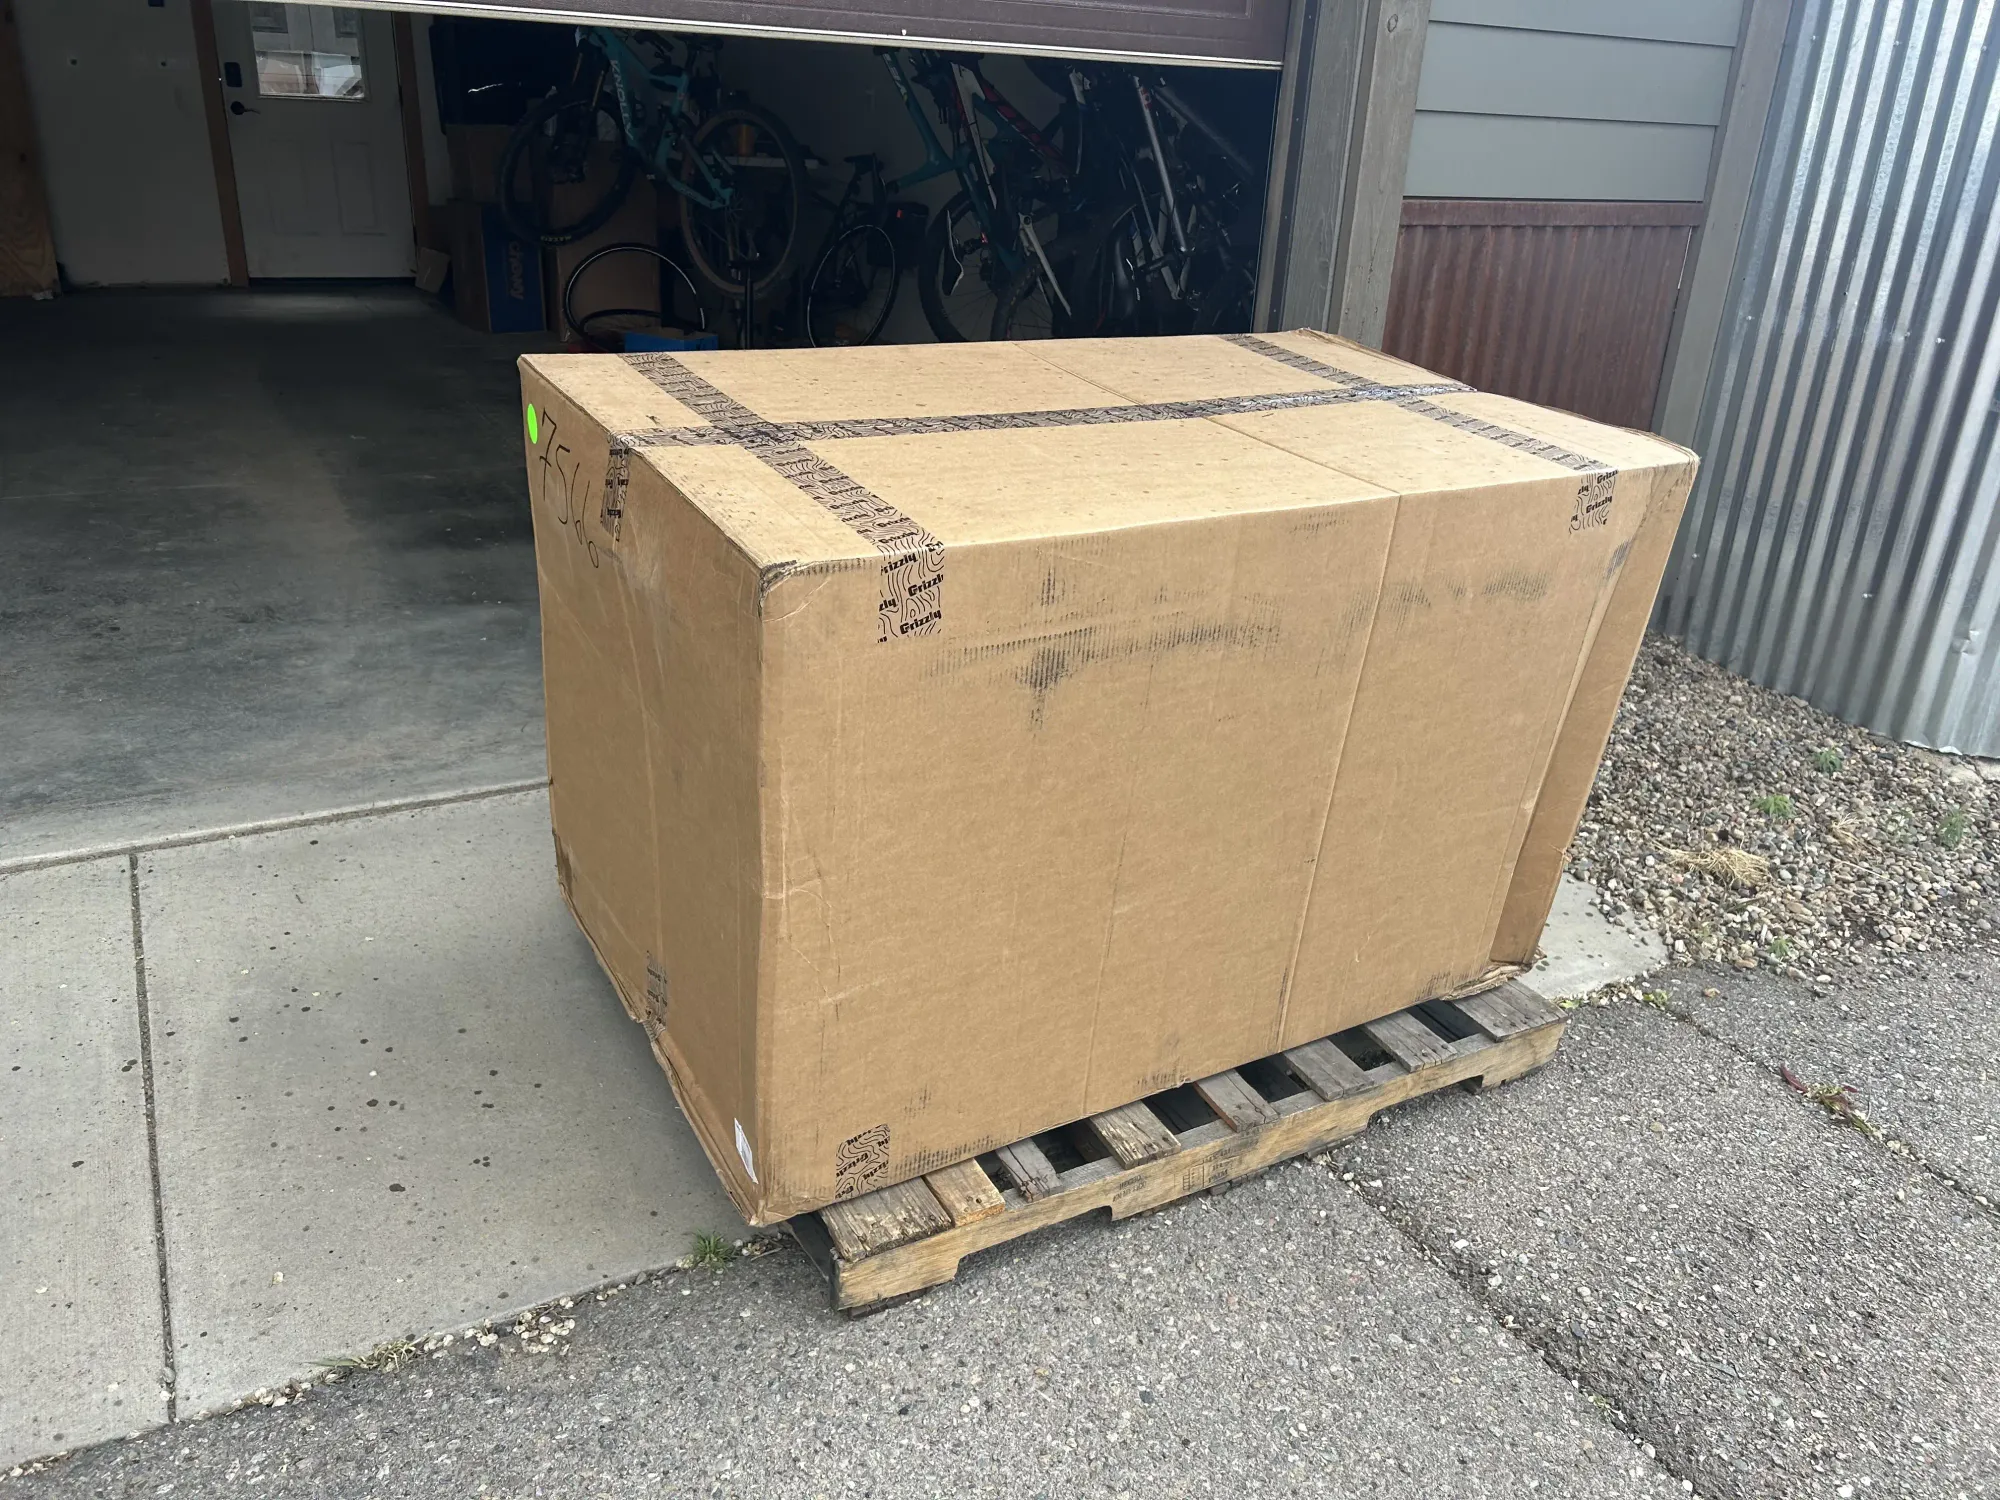
If you can find a Grizzley cooler locally, do that. If you buy online, the cooler will likely be delivered via freight and so will likely not arrive quickly. Make sure to order everything well ahead of when you intent on building the cold plunge. The cooler is over 100 lbs, so it's best to have someone to help unload it. Or you can be like me and try to move it yourself.
Plan out your build
Even if you follow my build exactly, make sure to lay out all your parts and make sure you have all the fittings you will need. Once you get started assembling everything, you don't want to realize you're missing something that you need.
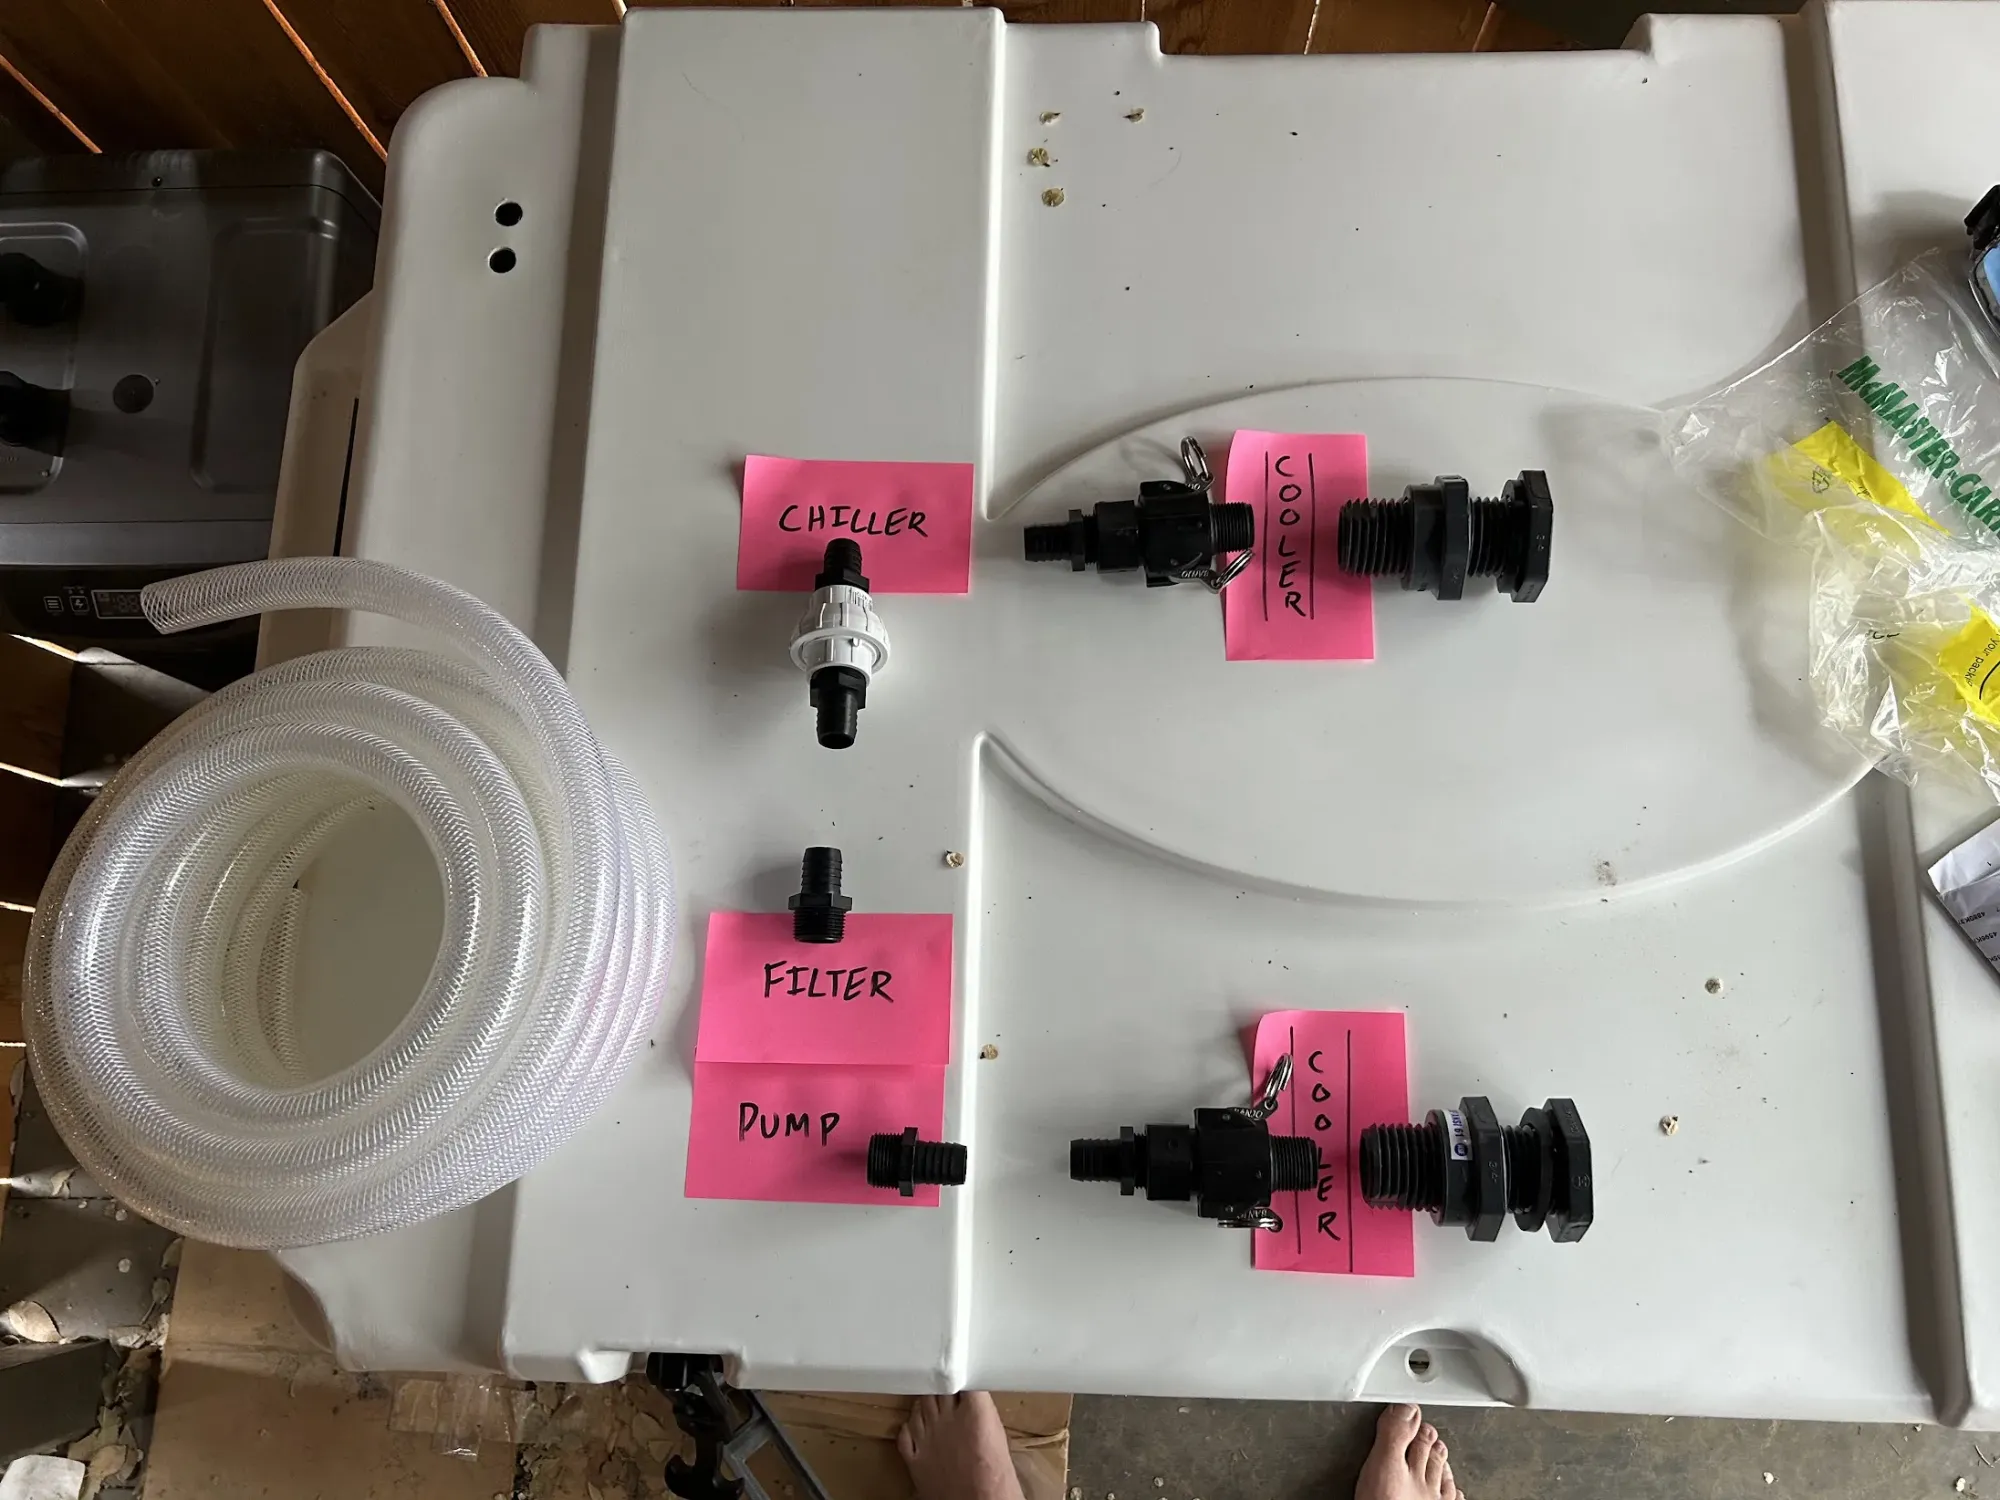
I chose to screw my filter straight into my pump to avoid one tube section and keep it more compact. However, I may eventually mount the filter on the wall, which is how it was designed to be used.
Drill holes in your cooler
This obviously can't be undone, so be careful and methodical. The holes can be on the side or back, depending on where you want the pipes to come out. The cooler floor is fairly thick, so make sure you don't drill too low. Additionally, don't drill the outlet too high, because it needs to be able to suck water in.
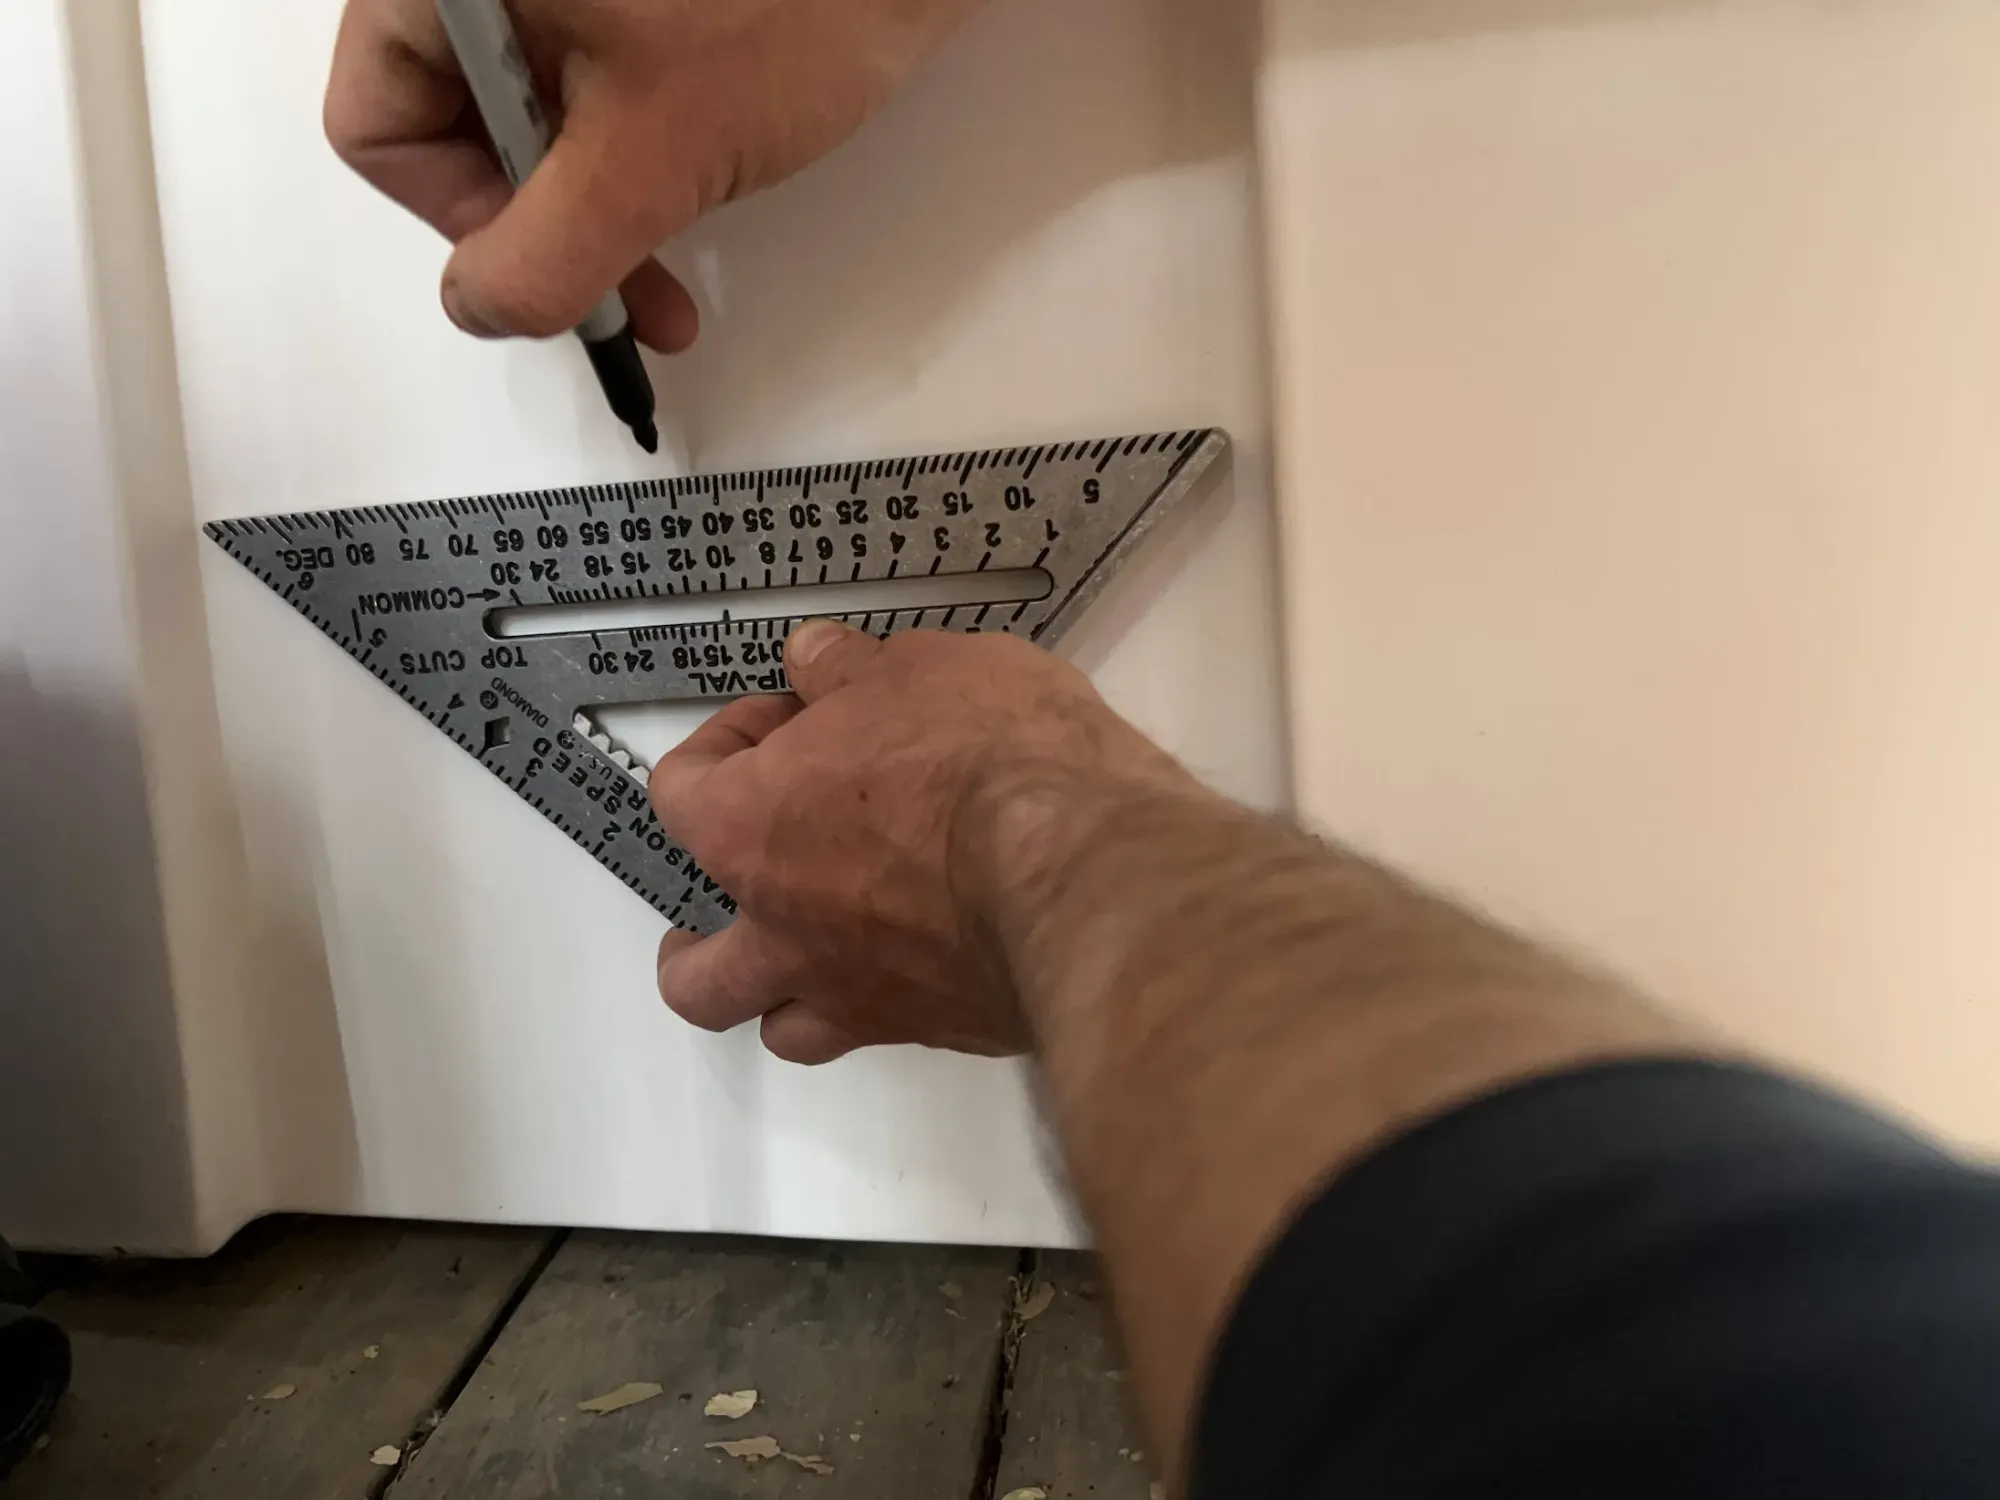
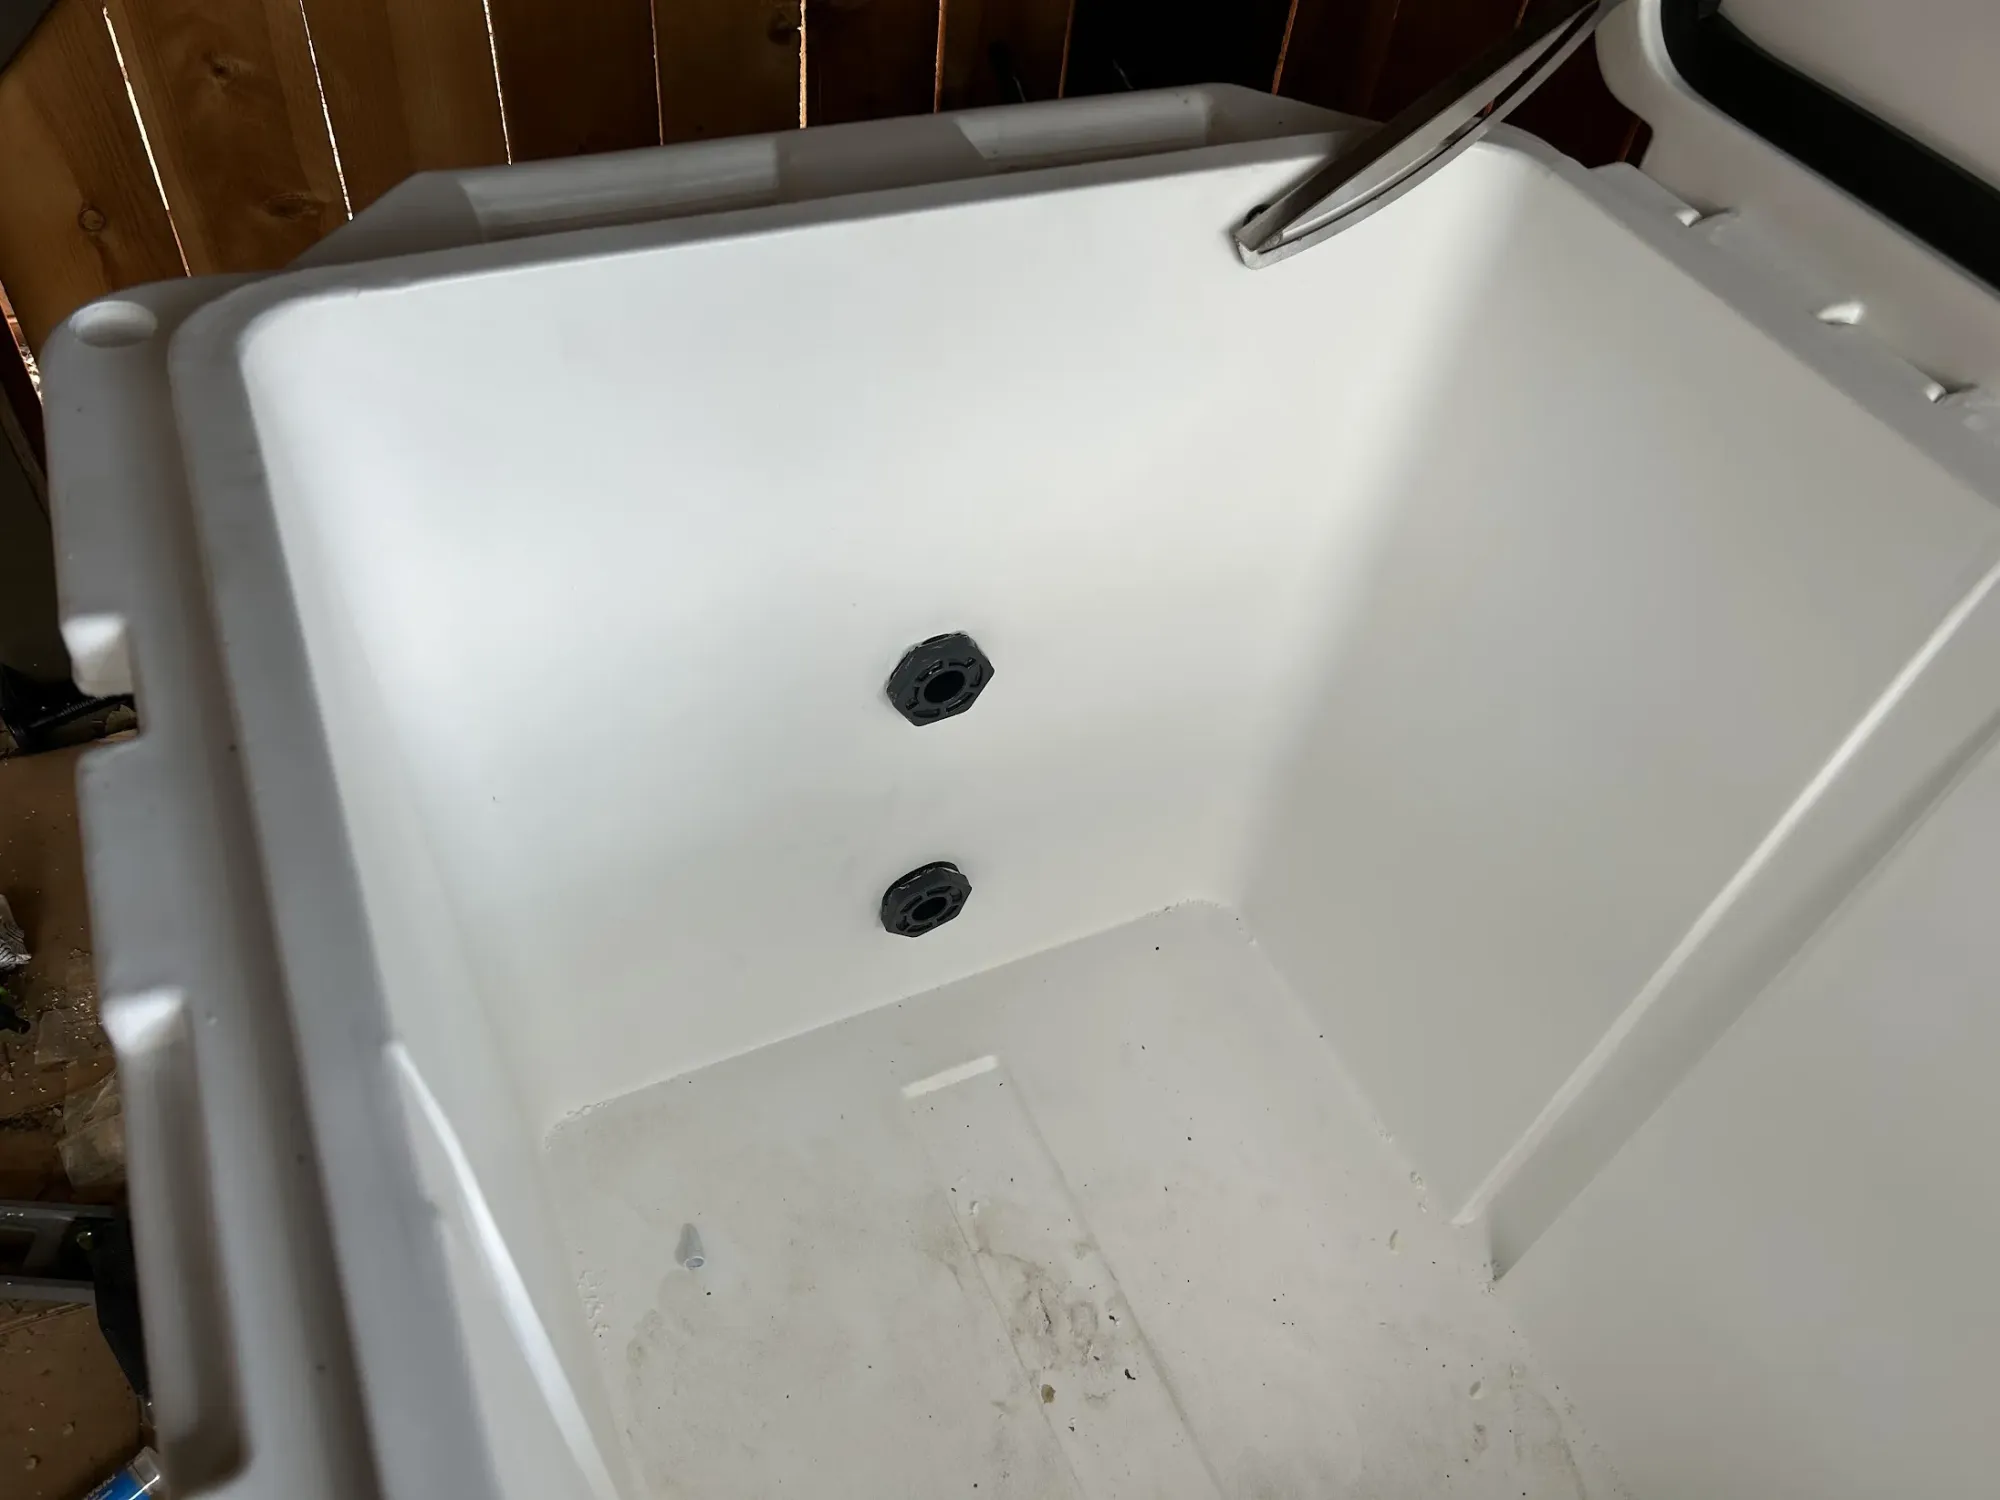
Mark the center of where you will drill, and then check several times that it's in a good location. I chose to add both holes to the ends in the center, with the outlet below the inlet. My outlet hole is 9 inches from the bottom of the cooler (on the outside), and the inlet hole is 18 inches from the bottom of the cooler.
Drill a pilot hole where your hole will go. This will help the hole saw bit not to wander on the slick plastic surface of the cooler. Make sure to drill perpendicular to the cooler wall. The cooler walls are slightly flared outwards, so it's easy to accidentally drill slanted.
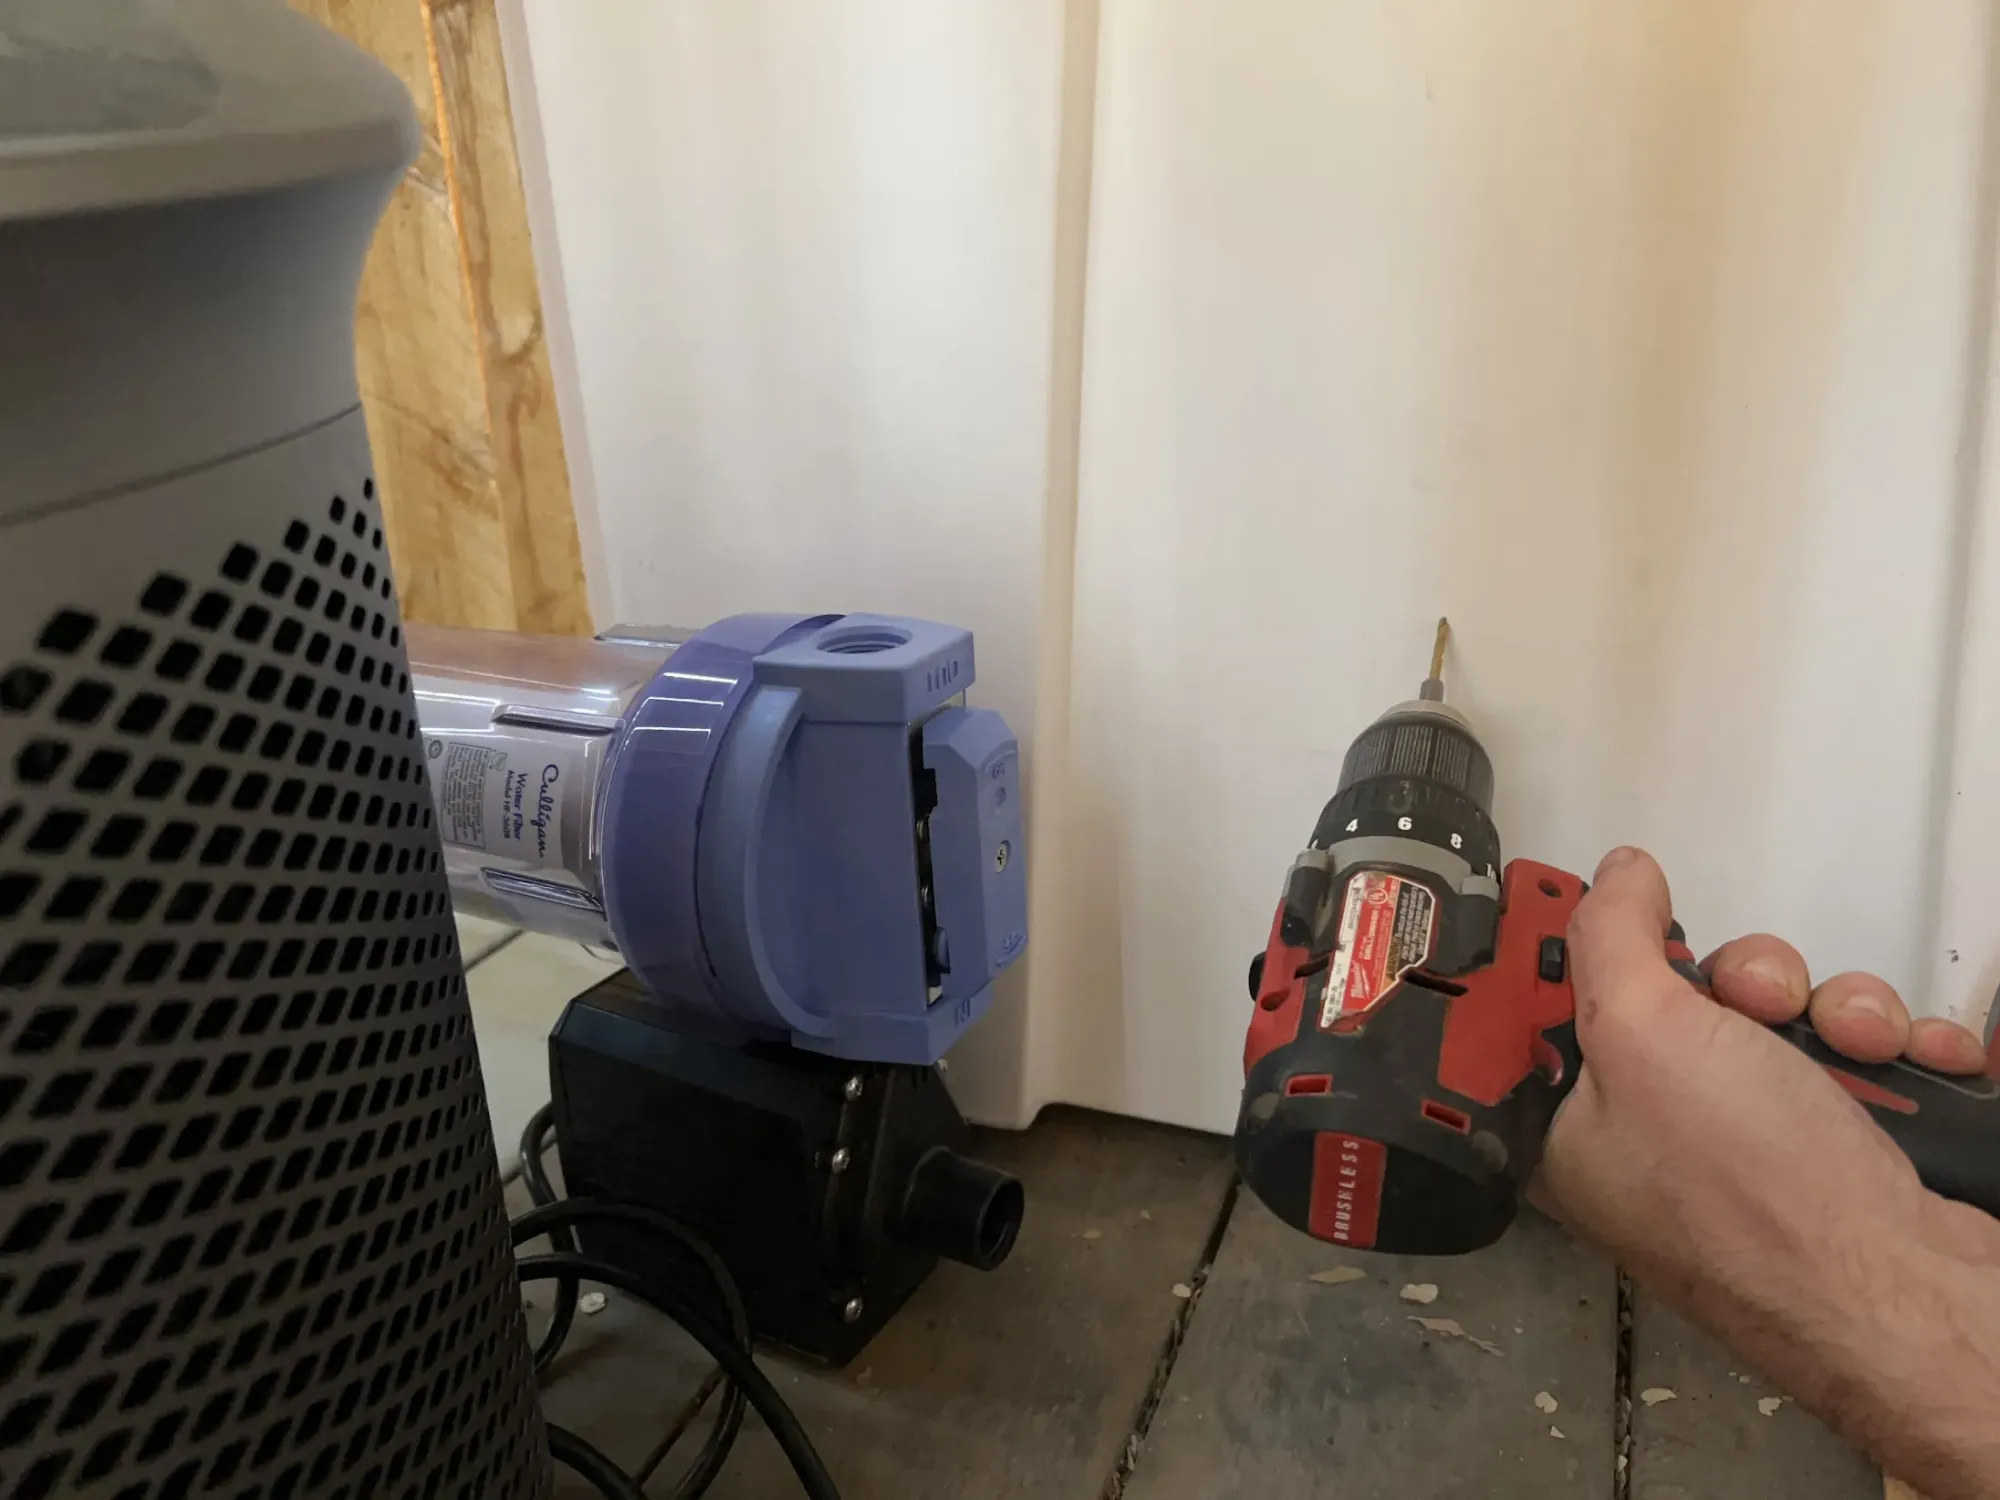
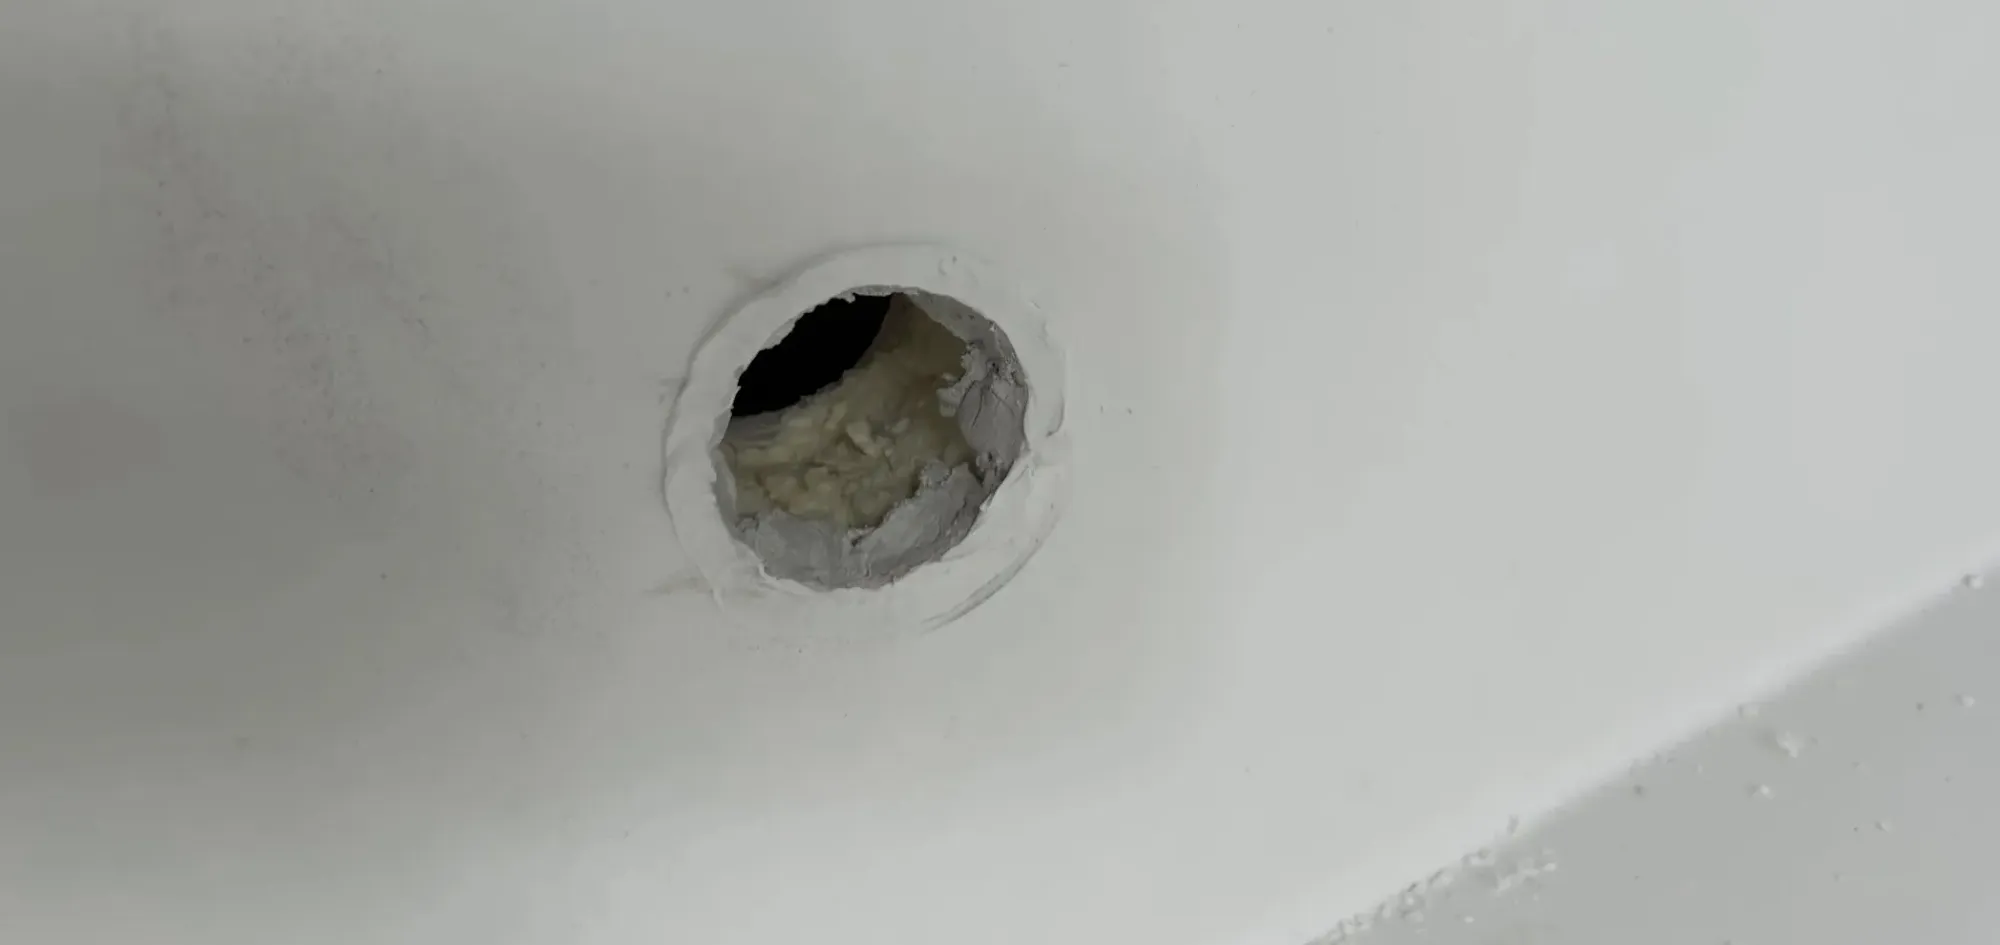
Then, use your hole saw to cut the hole. Tip: run the hole saw backwards (reverse on the drill) to make a very clean surface cut. Once you've started the hole, you can use the forwards direction.
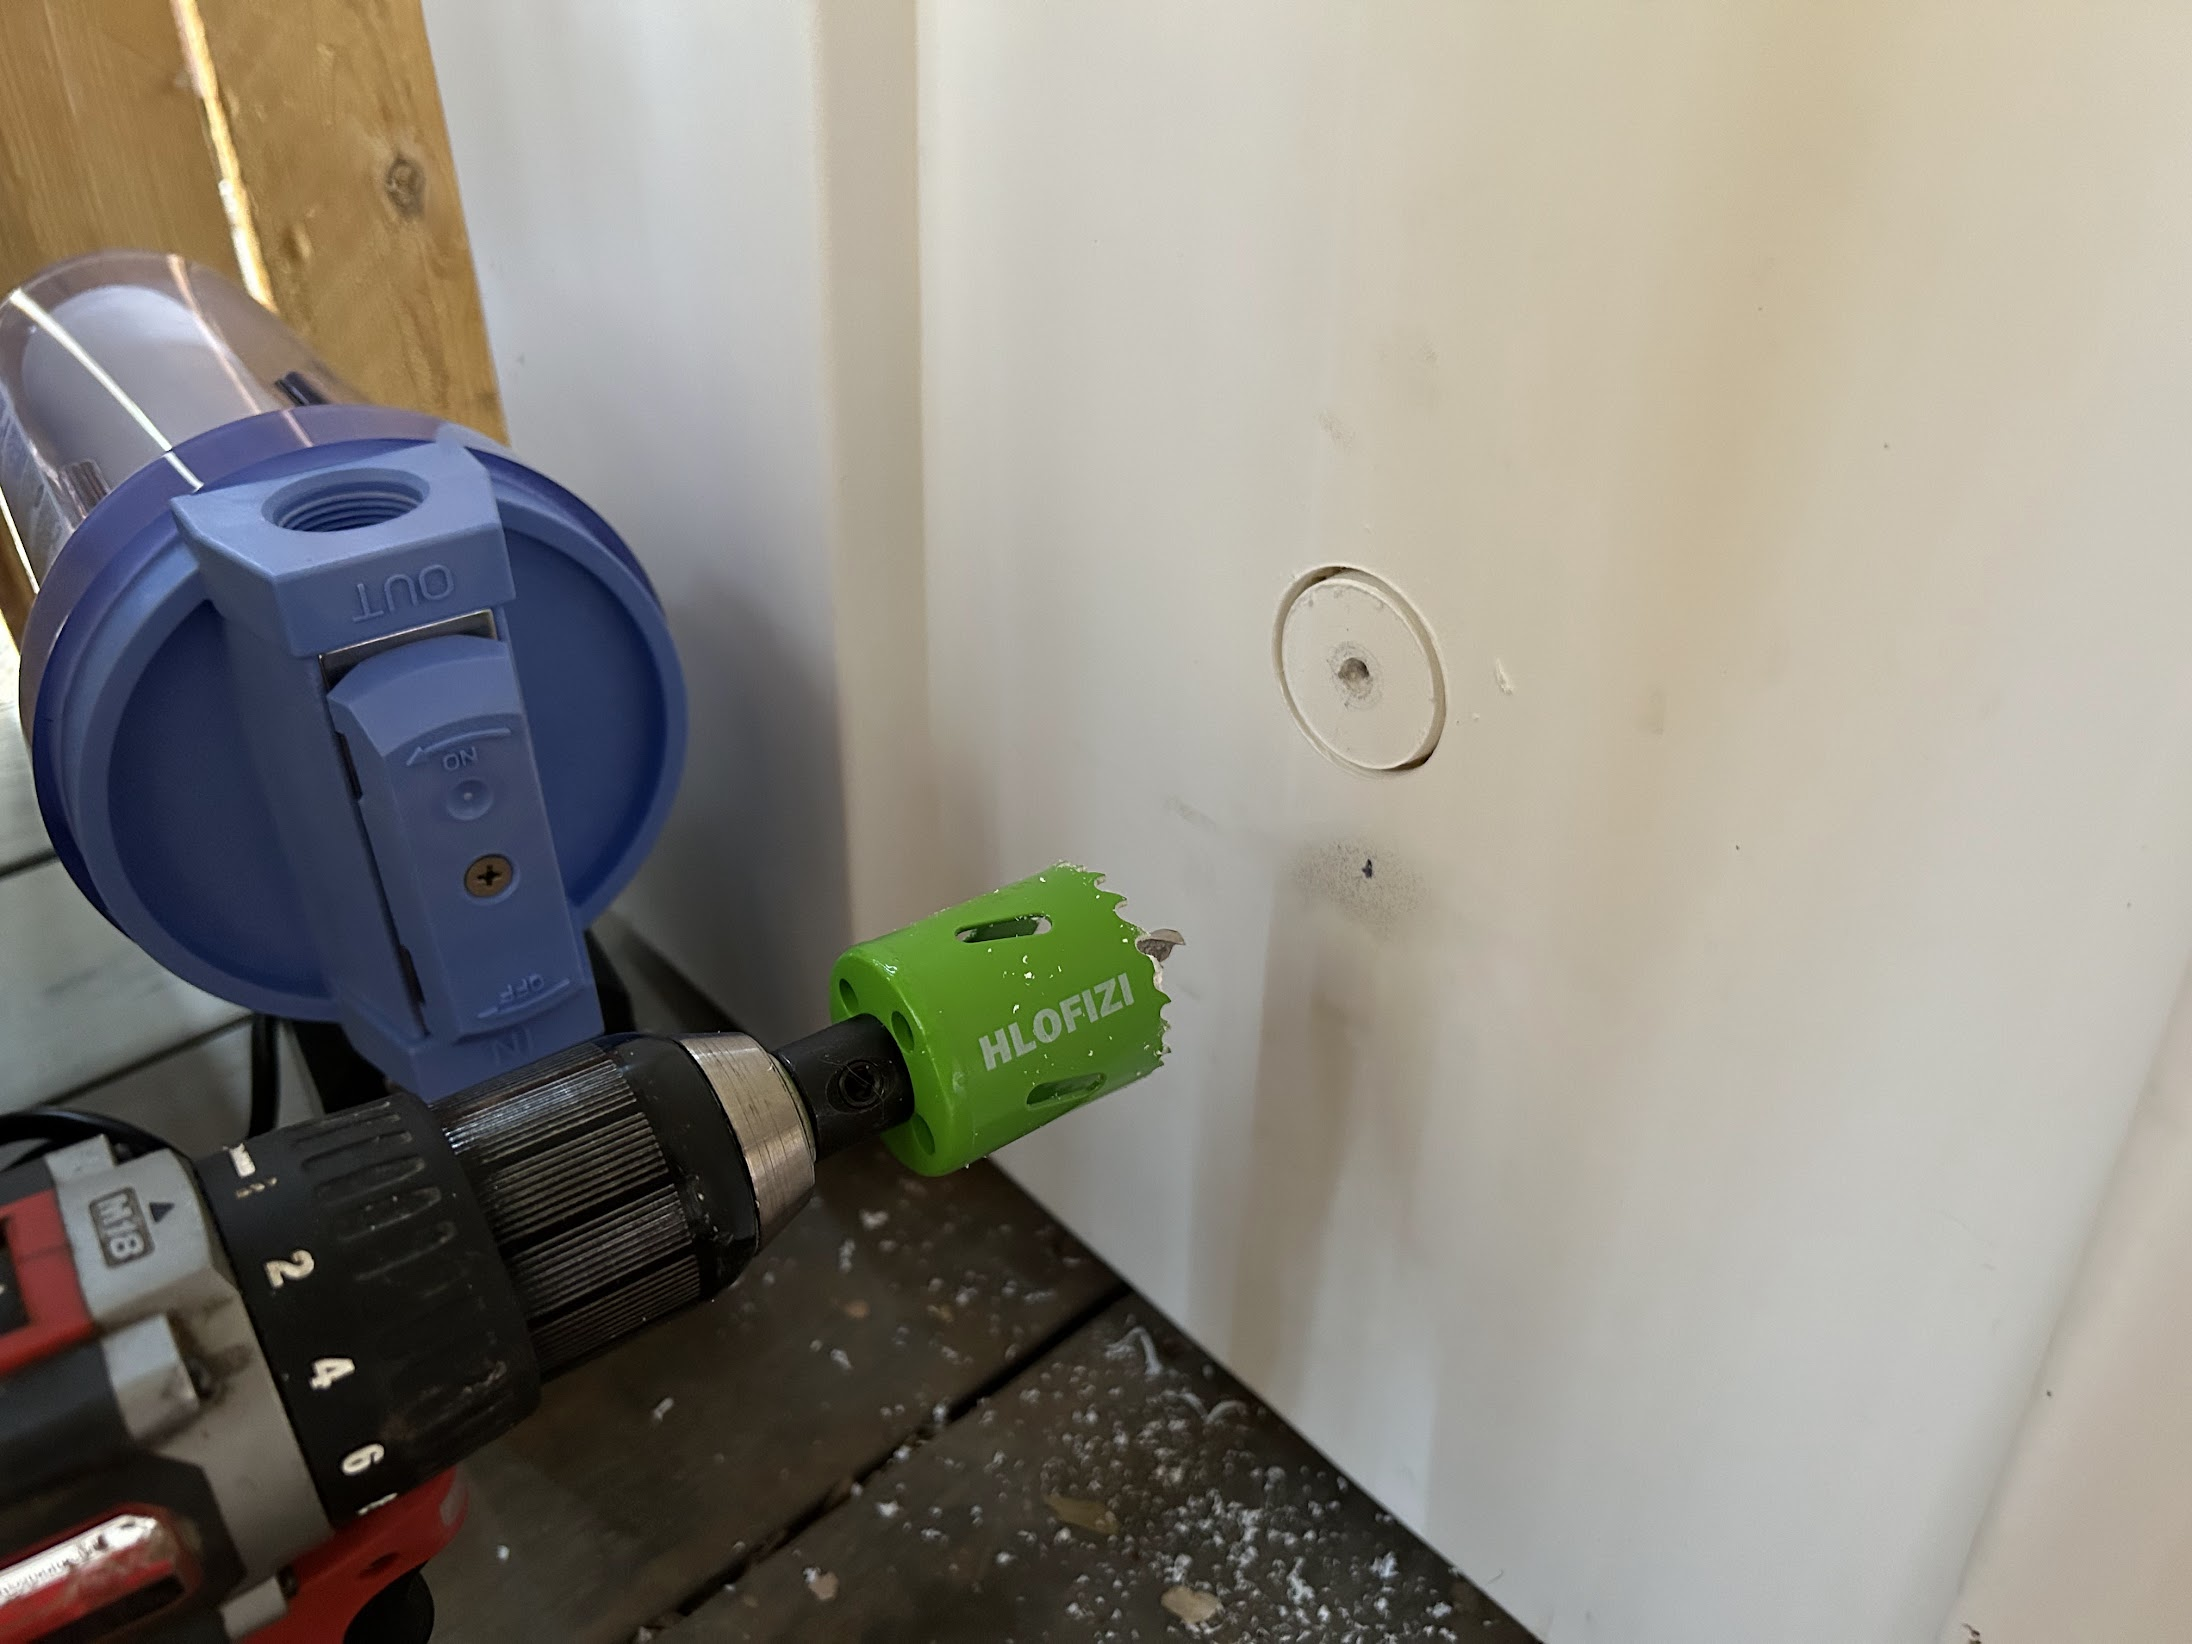
The wall is thick, and you don't want any tear-out inside the cooler, so stop before going all the way through. The hole saw's drill bit should pierce through, though, so you'll know exactly where to cut from the other side. If it doesn't, use your normal drill bit to create a guide hole that goes all the way through. Once it's through, use the hole saw on the inside of the cooler to go through. Remember to run the hole saw in reverse initially to get a clean hole.

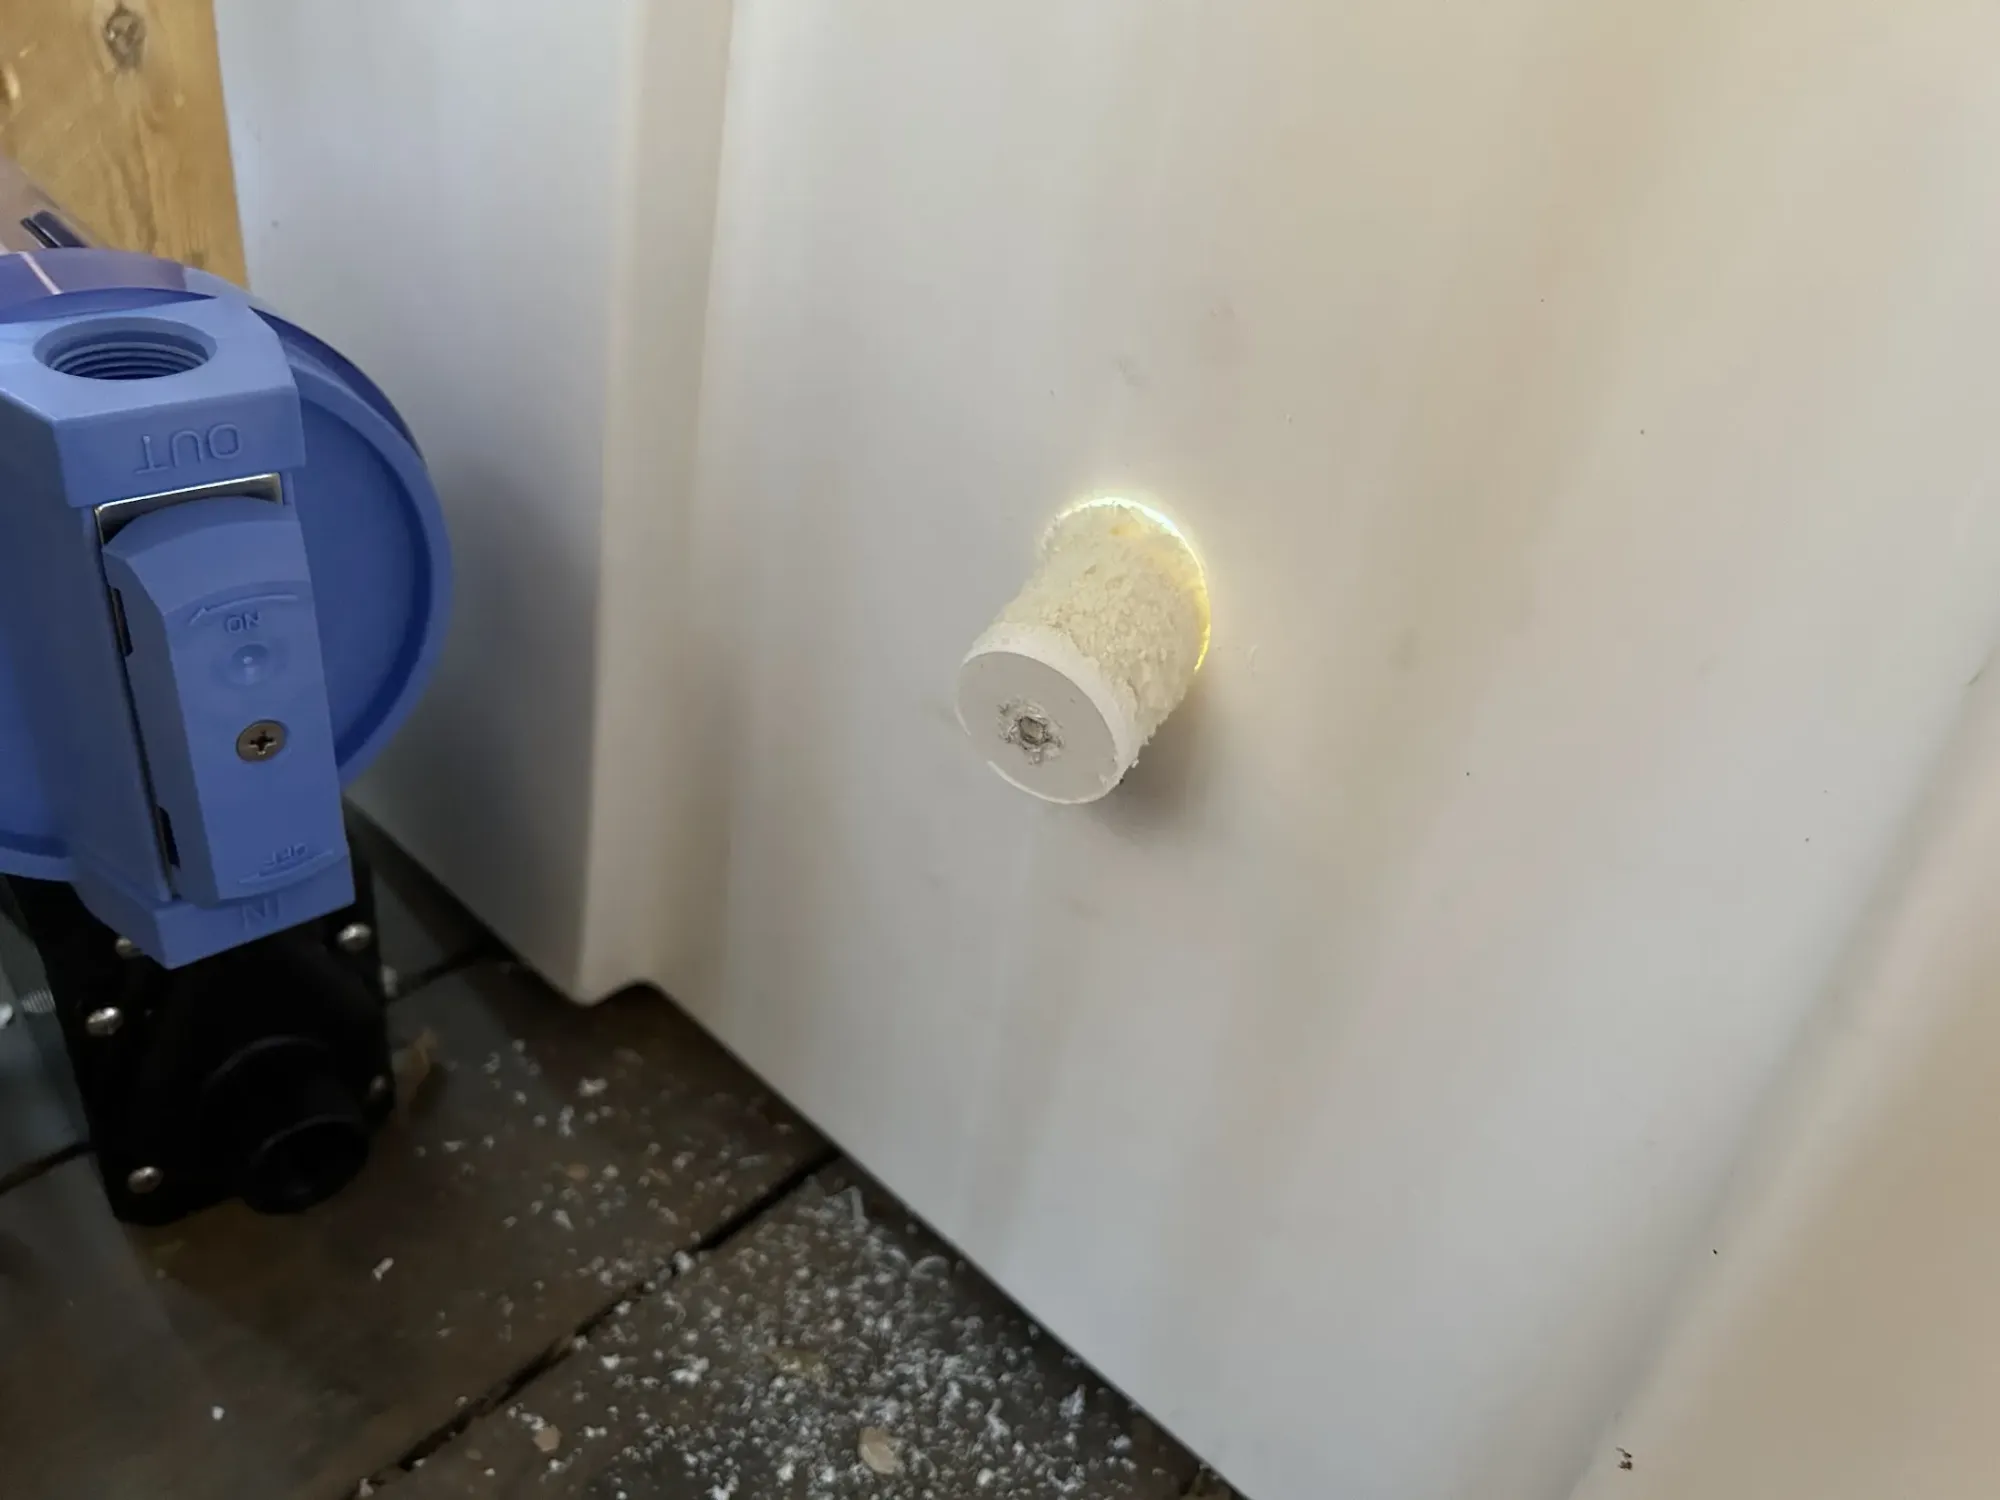
My hole was 44mm thick (~1.7 inches), but yours may be different depending on where you put the hole.
I then added caulk to the hole on the inside of the cooler to ensure a good seal. This ended up not being required because I sealed it further later, but based on some research online, I think it is worthwhile to seal it in some way.
Then, install the bulkhead through-wall fittings:
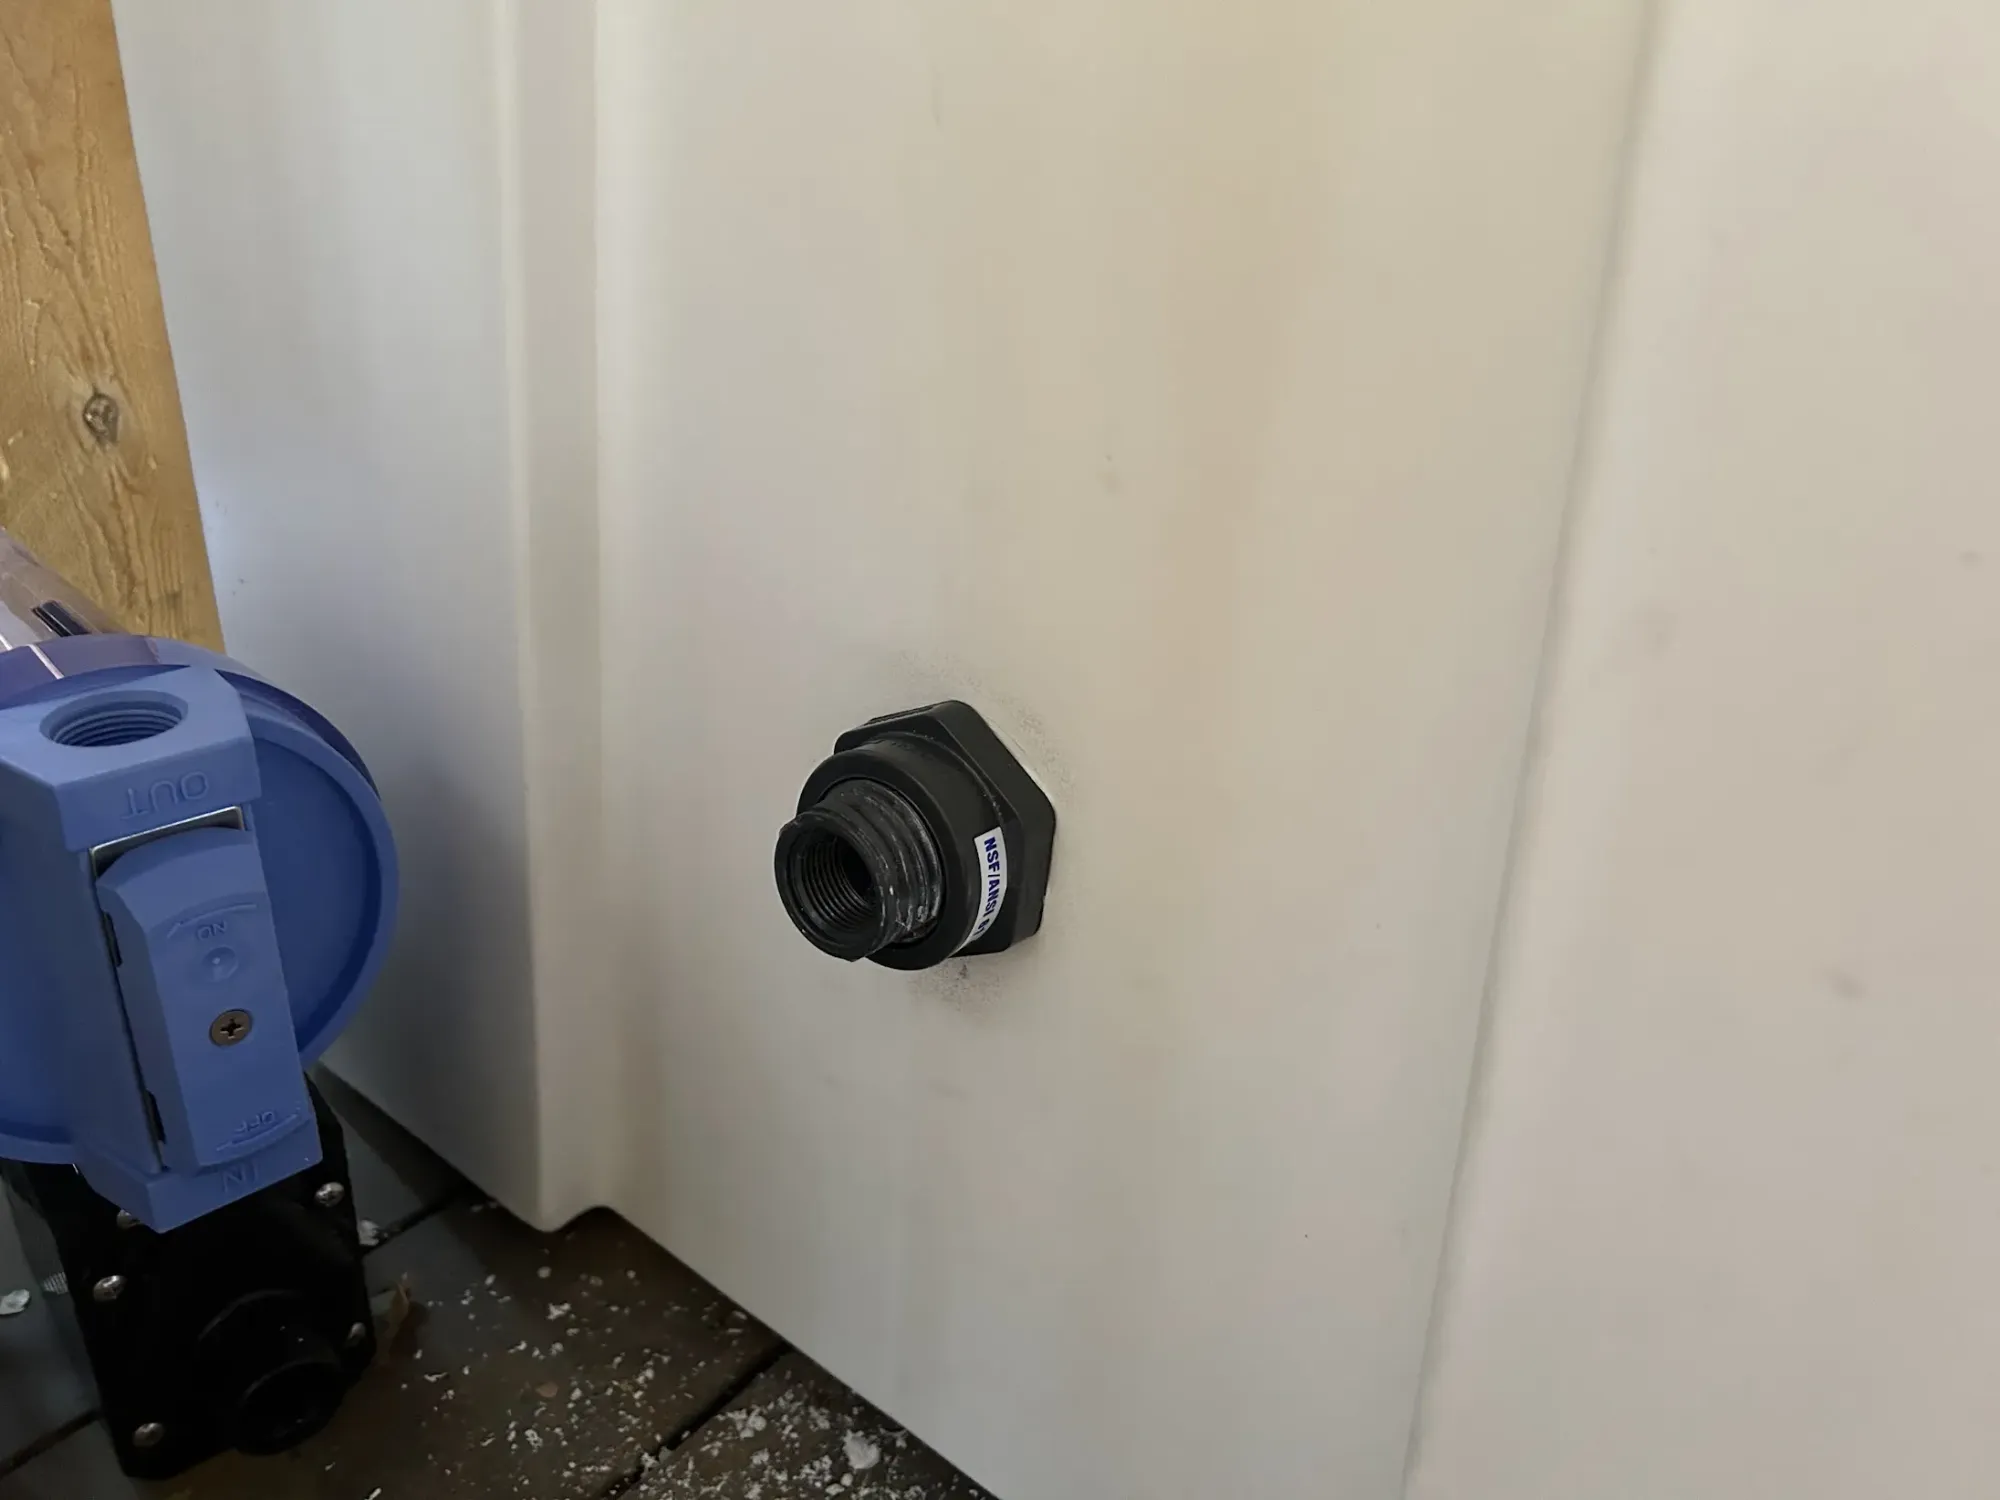
I was concerned about leaks around the bulkheads, so decided to add a thick layer of JB Weld Water Weld around the entire fitting on the inside. This may not be necessary, and has the downside that the fitting can't be removed. I recommend not doing this initially, and only considering it if you see leaks.
Next, put together all the fittings. On all threads, add a generous layer of pipe thread sealant using the included brush to prevent leaks between the threads.

I laid everything exactly where I wanted it to go, which makes sizing the tube much easier. Make sure there are no tight turns that your tube won't be able to easily make.
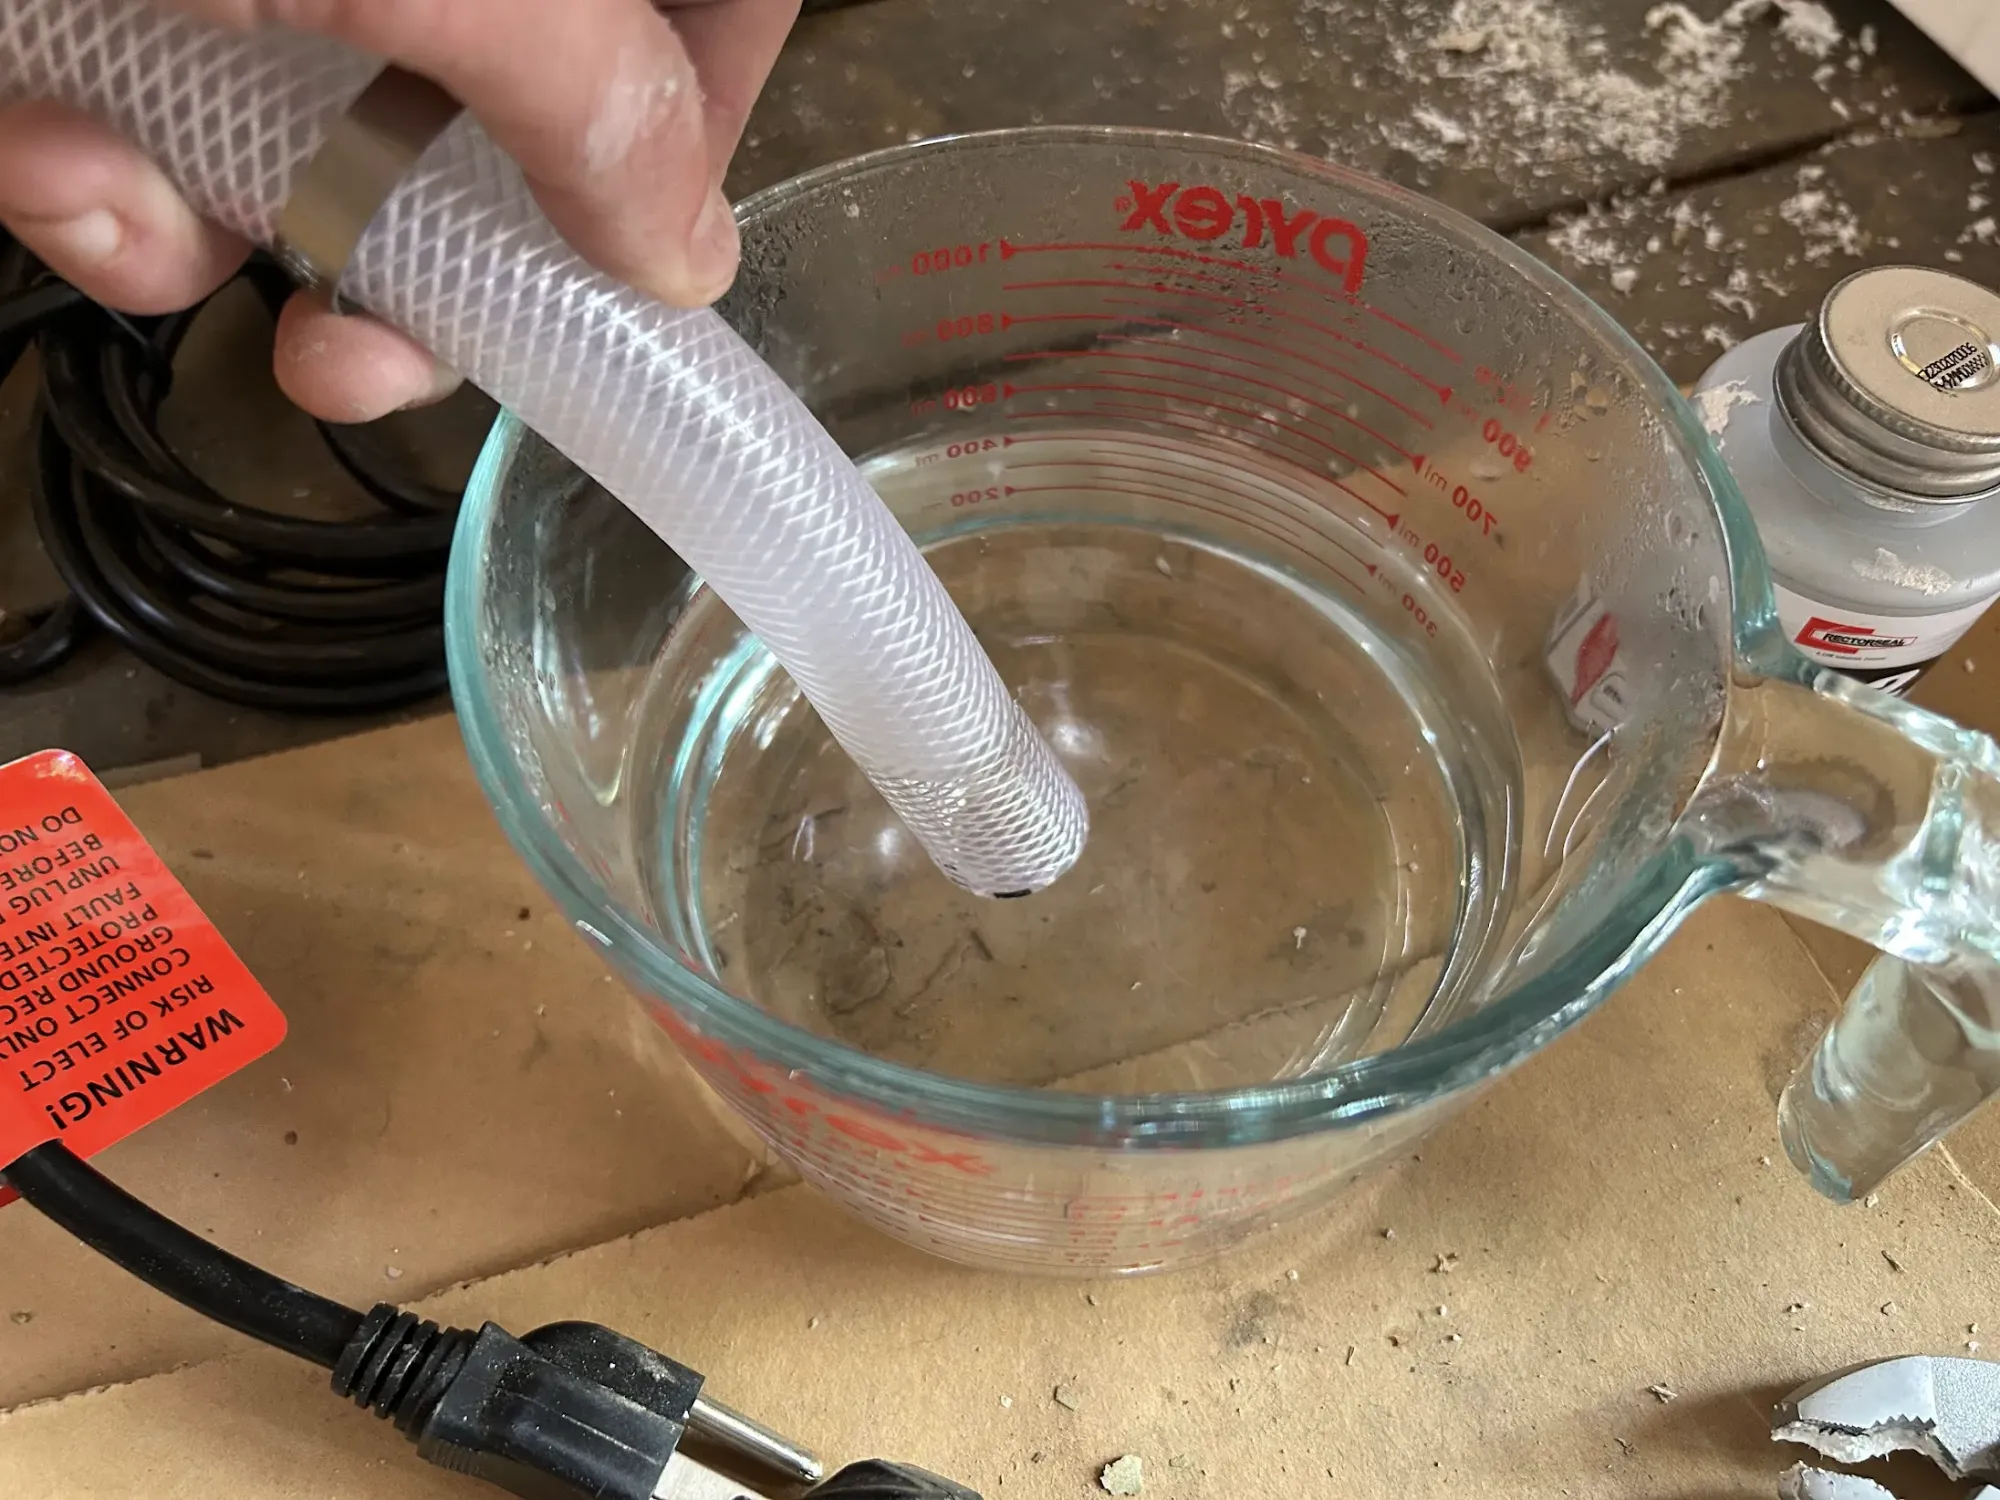
Then, cut the tube. I recommend doing one section at a time, attaching it fully, and then cut the next one. This lets you make small adjustments as you go. To easily get the tube into the barb pipe fittings, put it in hot water for around 10 seconds. The tube will become much more pliable, and you'll be able to easily attach it on to the barb fittings.
Attach one end of the tube, then add two hose clamps (one for each barb fitting). You can tighten these later, but won't be able to easily add them once you put the barb fittings on.
This part goes fast, and in a few minutes, you'll have everything assembled:
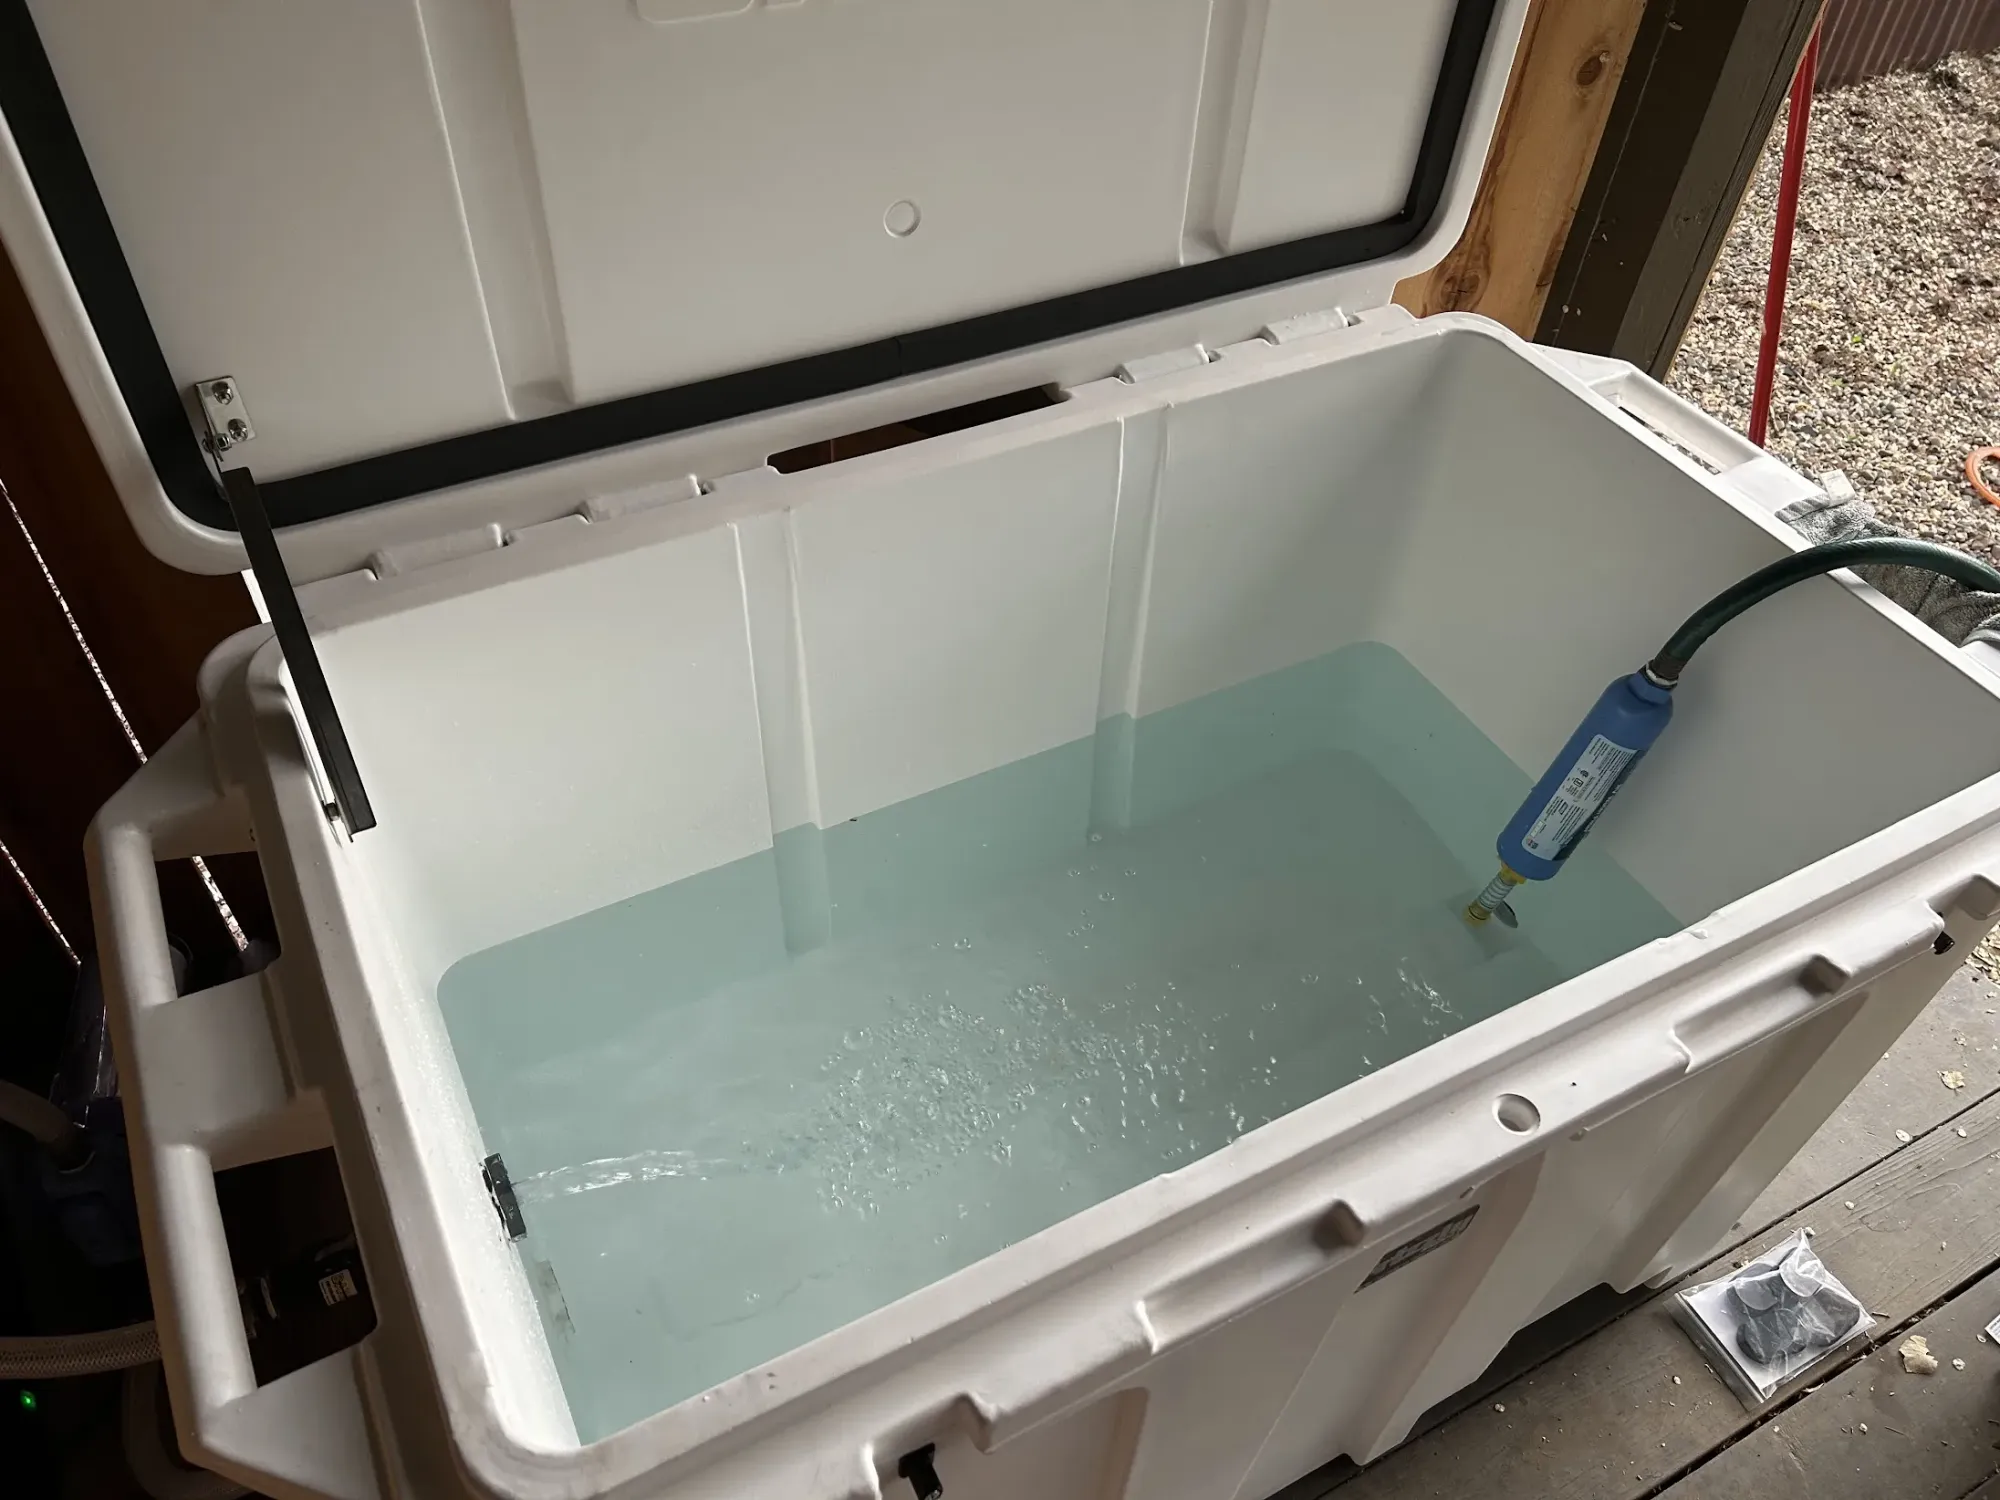
Tighten the hose clamps, and you're ready for a static leak test. Fill your cooler with water to cover the outlet hole. Water will start to flow towards your pump. Carefully check for leaks. If you see nothing, turn everything on.
Carefully examine all fittings and seals to make sure no drips are coming. Be exhaustive, because it's far easier to fix it now before the cooler is entirely filled up.
After it's filled, you get to test it out.
Finally (note added November 2023), I recommend removing the metal hinge. As long as you're careful not to push the plastic hinges hard, it's entirely unnecessary, and mine and several others ended up rusting over a few months. I plugged the holes with caulk.
Maintenance
Your cold plunge will stay cool and the filter will remove most particulate. Depending on if your plunge is inside or outside and how clean you are when you get in, you may also need to consider sanitization in addition to your filter. Hydrogen peroxide (2-3oz of 12% solution) or chlorine (~3g of chlorine granules for hot tubs) both work. Do not do both — they react with each other. Eventually you may want to pick up a test kit to keep levels in check, but initially, you can use your best judgement and adjust as needed to keep the water clean.
Alternatively, instead of chemicals, you can use an ozone generator in-line with your system. This is a bit tricky to get right, involving using a venturi and a ozone generator that can output enough ozone, and carries some respiratory exposure risk. There's also internet controversy as to whether the ozone would break down the plastic that the Grizzly is made from (with several others saying it won't).
You may also want to get some hot tub cleaning tools for larger particulate that your outlet doesn't suck up (such as if it floats or sinks to the bottom). This $1 water toy (or better, this one with better capacity and thicker plastic) is super useful to collect particulate on the cooler floor.
Check your filter regularly to make sure it's not too dirty. The filters are fairly cheap, so replace them as they get clogged to not wear your pump down.
Optional improvements
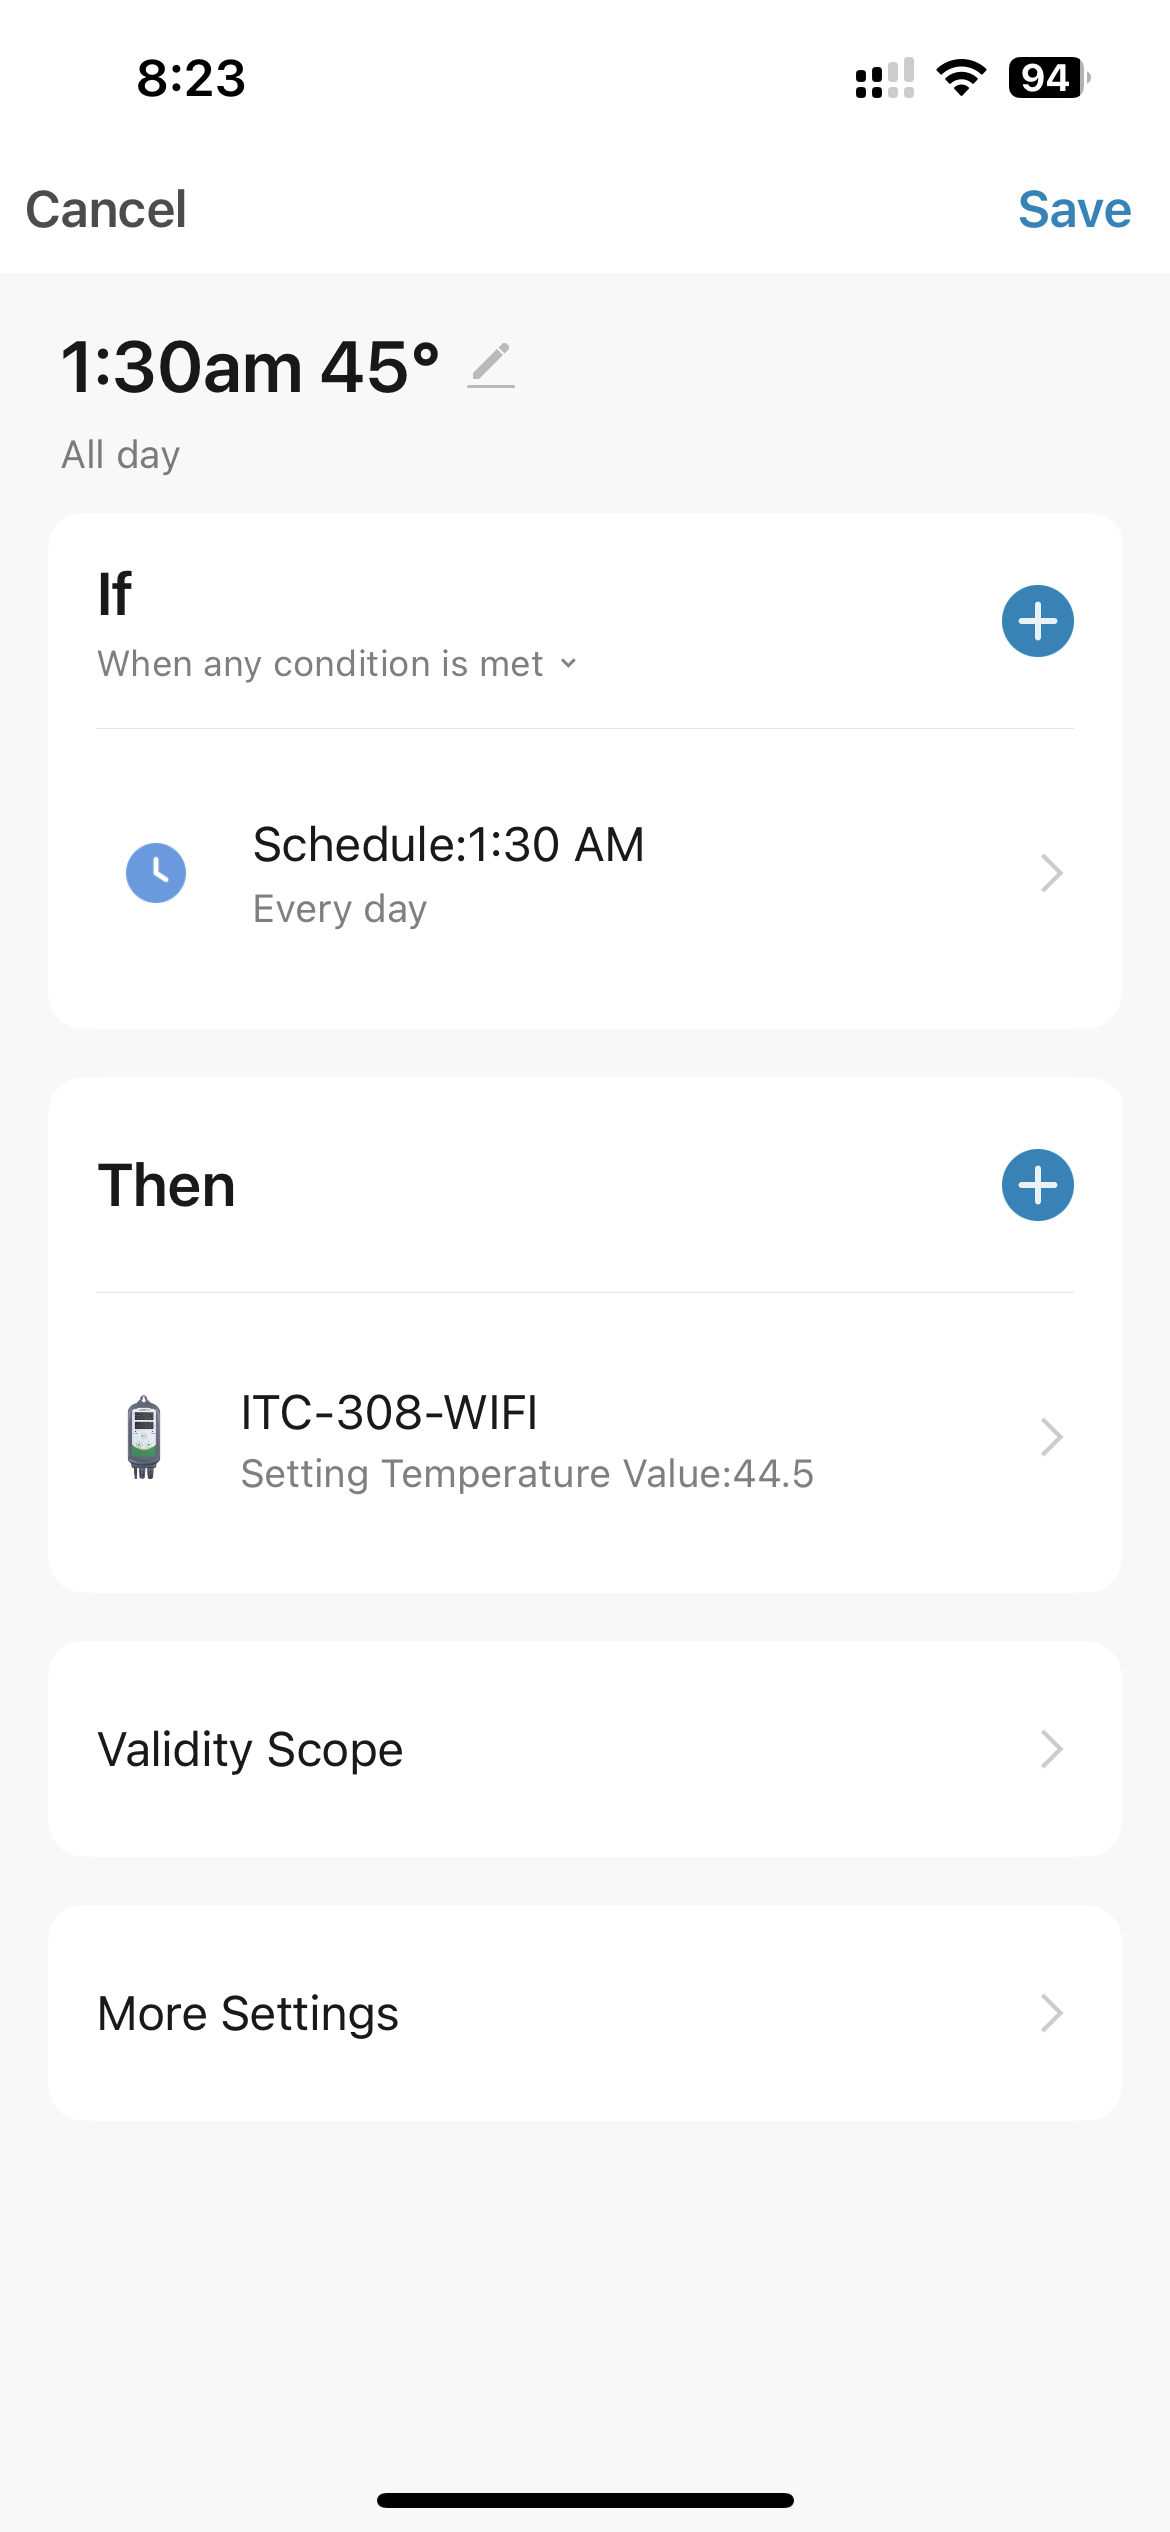
The biggest improvement I'd recommend is to add a temperature controller. This allows you to automatically cut off the pump and chiller when they're not needed, and gives you remote control monitoring and basic smart automation. I use the Inkbird WiFi ITC-308. The temperature probe fits with the lid closed, but you can also drill a hole to slide it through. If you do, I recommend using a straw or small tube to line the hole, so that no water can get in the cooler insulation.

The Inkbird always stays plugged in and on, and you'll plug the chiller and pump into the "Cool" outlet (with a power strip or similar).
Once set up, you can have the chiller and pump only run when the temperature is above a set point. I recommend that this set point is slightly above the temperature on the chiller. Even though the chiller can be programmed to a specific point, it'll still draw power, and you'll still be running your pump.
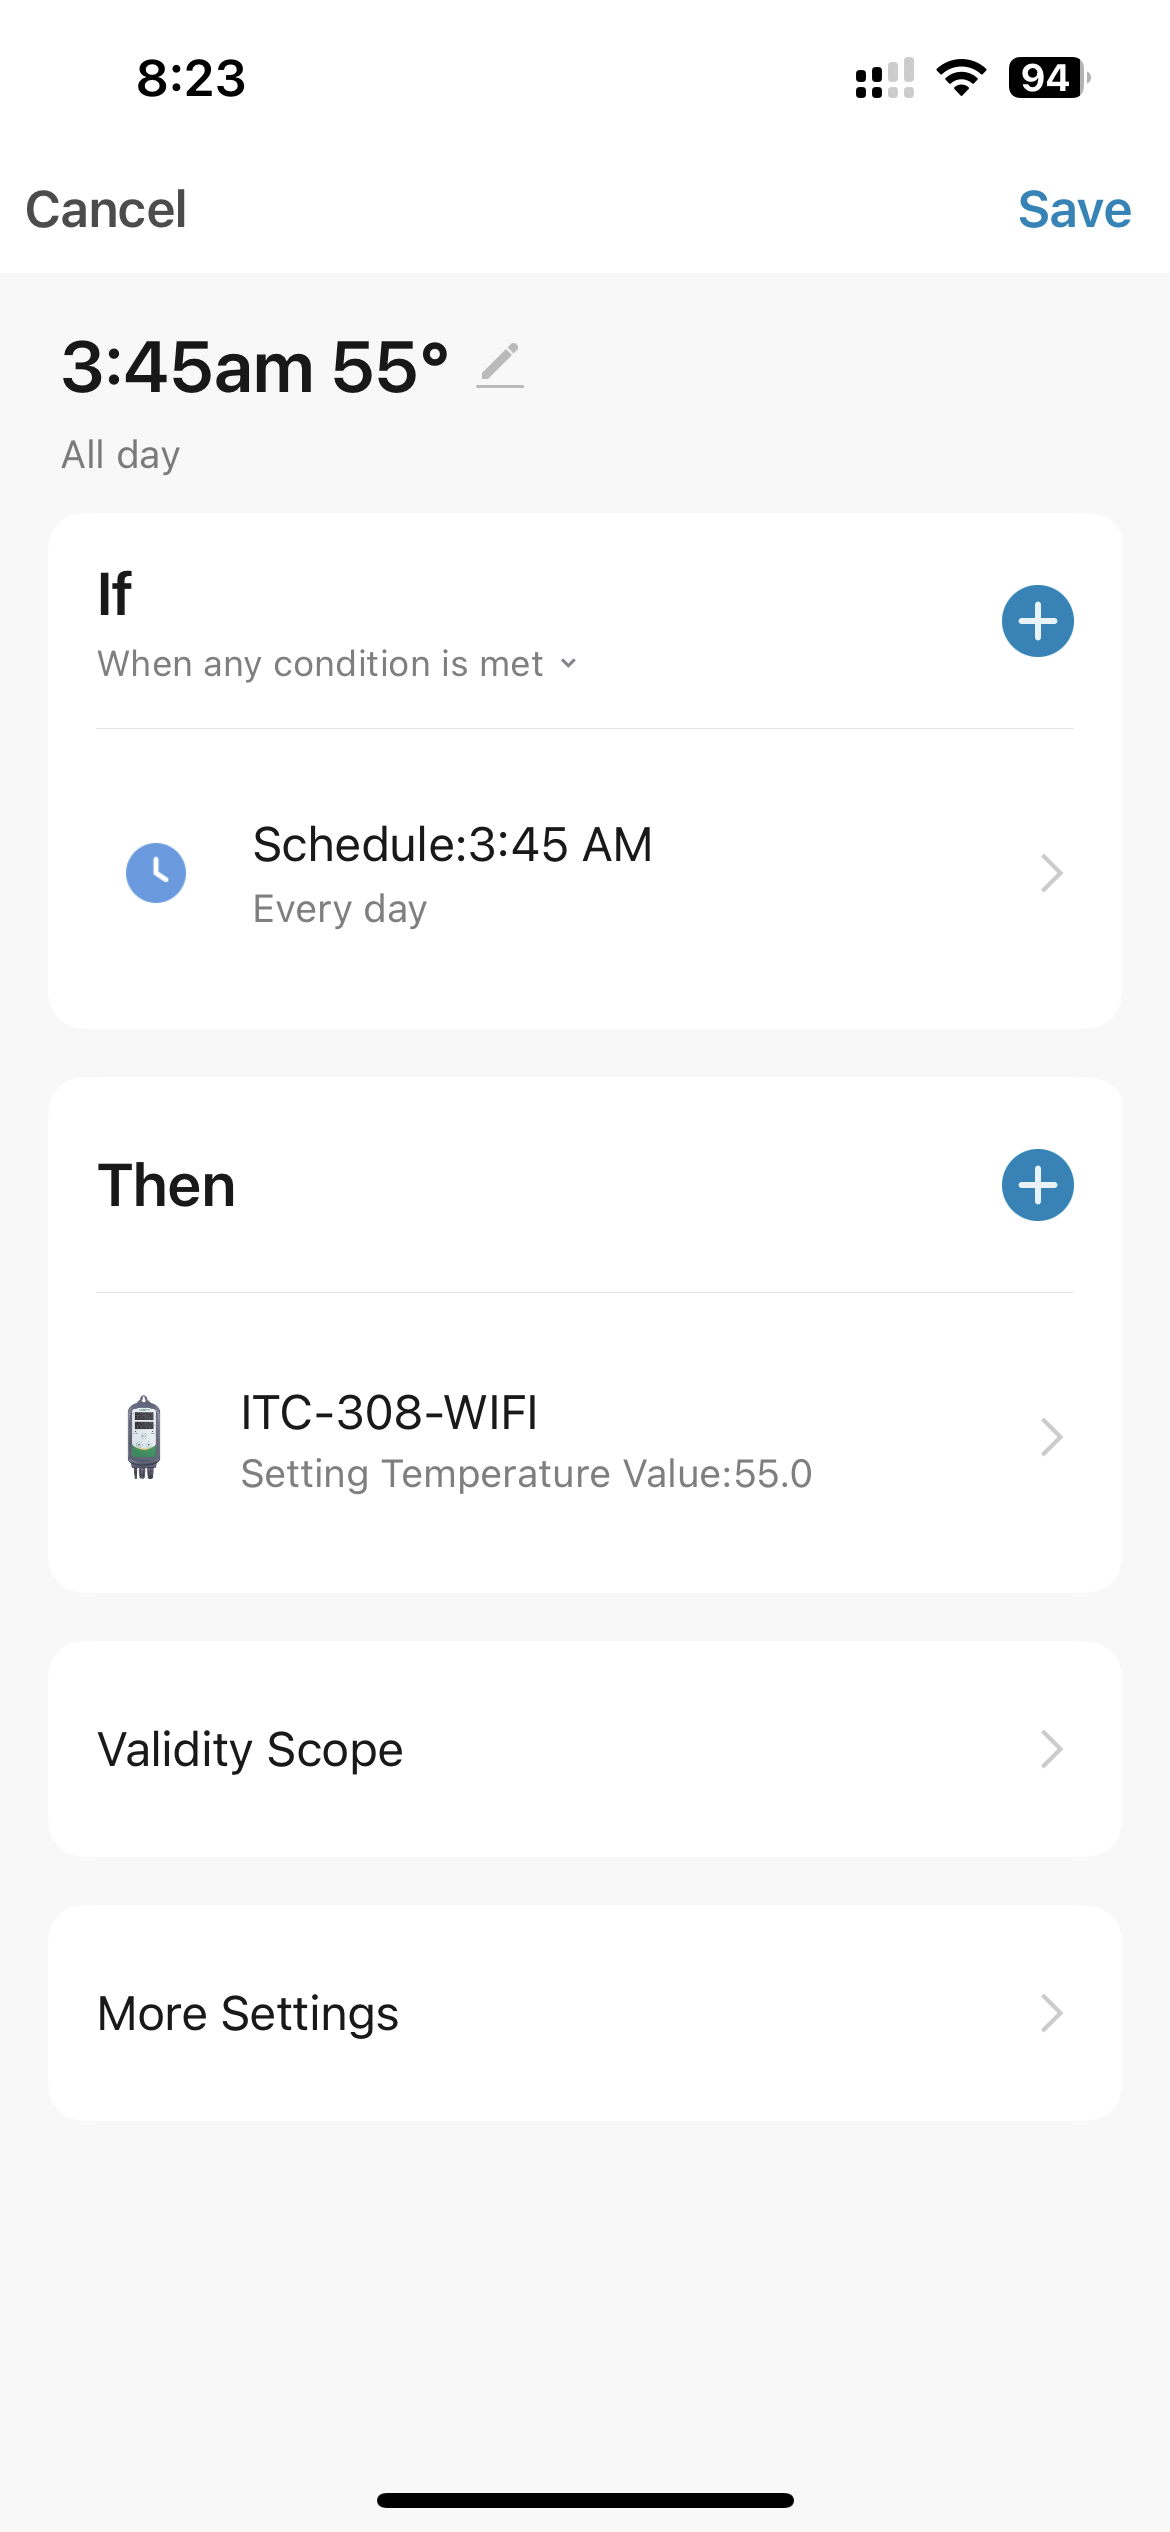
Inkbird supports "smart automations" which let you do more complicated scheduled temperature controlled cycles. I decided to run my system only at night (cheaper power). At 1:30am, I have an Inkbird automation that sets the temperature to 45.5°F (my target temperature). Then, at 3:45am, I have it set the temperature to 55°F, which immediately turns off the pump and chiller. The insulation of the Grizzly is good enough so that in the summer, my plunge would gain about 6°F before the next night cycle, which was acceptable for me. If you're in a warmer climate or the cooler is in the sun, you may need to change these numbers a bit. In total, running the chiller and pump only two hours a day reduces the total electrical cost to less than $10/month, even in the summer.
Note that this specific configuration means the filter is only used just over two hours a day. This has been fine for me, but you may find it's not enough. If so, just increase the amount of time the pump runs.
Also, you may want to consider a master-controlled (also called "control/switched") surge protector. These are often sold to save energy, where if the master device stops pulling power, it cuts off power to secondary devices. The pump will be the master with the chiller as secondary, so that if the pump stops for whatever reason, the chiller will also be turned off. I have this one.
FAQ and learnings
You are all wonderful and I've had several great conversations with people who have built or are planning on building their own cold plunges. I'll keep this section updated with useful takeaways.
Would I change anything?
The most common question is whether I'd change anything. As of November 2024, it's working as intended. I did add a note above about removing the metal hinge — they tend to rust and aren't necessary. Overall, though, it has worked great, continued to operate cheaply, and had no issues. It's continued to be shockingly efficient: the chiller cools at right around 4°F per hour, so only needs to run for 1-2 hours a day. Starting in September, the chiller basically stopped running because it was holding the temperature effectively. Changing the filter is a little bit tricky because I chose to install the filter straight into the pump, but it's not bad if a small water spill is acceptable.
The only pumping-related thing I'd consider changing is adding an on/off valve so that I can easily disconnect everything with no leaks.
How often do I change the water and filters?
This ends up being entirely dependent on how dirty you and your friends are. Mine is sitting in an outdoor shed where people can wipe their feet before going in, so we do a pretty good job keeping big particulate out. I don't ask/require people to shower off first, but do use chlorine.
Overall, the water seems to last several months without needing changing. It just slowly gets slightly cloudier, and eventually I decide fresh water would be better. It never gets off-color or smells.
I replace the filter when I notice it looks pretty clogged or water flow seems reduced. Filters typically last several months as well.
The importance of insulation
I expected insulation to matter, but it really matters. My current (in late June 2023) energy needs are roughly 2500-3000 BTU per day. As it gets warmer, it'll likely increase to around 5000 BTU a day. My chiller cools the water at around 2500 BTU/hr (less than rated, because of heat losses in the uninsulated tubing). As in: currently the chiller runs for 1 hour a day, and worst case, will only run about two hours a day. It's shockingly efficient.
Metal stock tanks lose coolness (gain heat) significantly faster. The savings from using a cheap stock tank may entirely be negated by electrical costs over a year. I've heard from one person who needed nearly 10x the BTU (~25000 BTU) per day to keep it cool.
If you do use a stock tank, the plastic ones insulate better. You should still consider using spray foam or other insulating layers, as well as a well-fitting lid. However, by the time you properly insulate it, the total cost may be similar to the cooler.
Sanitization
Chlorine and my filter has worked well for me, but I typically do a quick dip in my hot tub first (so, less skin oils and such coming off). If I needed better filtering, I would explore optimizing my flow rate. My current flow rate limitation is likely the filter. As of now, it's entirely fine, though.
I do accumulate grit/dirt on the cooler floor from dirty feet (my plunge is outside). I struggled to clean this out well until I found this $1 water toy that allows me to suck up any dirt super easily from the floor. It works quite well.
Chillers being expensive
Chiller prices have gone up. If you're on a budget, you may want to opportunistically find a good deal or wait until prices come down a bit. I purchased mine from a random gardening store online, and have seen some on eBay for reasonable prices.
Updated March 2024: I had originally pondered if the 1/10 HP unit would be sufficient, and several people tried that to find out. A few things we've learned: if you want reliable cold (below 45°F) or are storing outside in any amount of sunlight, it's borderline whether it'll work. For some people, it was just barely enough, and for others, it wasn't. If you try this route, make sure you can return your chiller if it doesn't work for you. I haven't seen consistent performance, so I'm not sure what other variables exist, but the success cases have seemed to be in climate-controlled areas, and running to 45°-50°F instead of pushing below that.
A single point of reference: with my setup, where the cooler is in the shade and avoids all direct sunlight, over a day, the water gains roughly 1°F for every 6°F difference between the water temperature and the daily average temperature. For example, if the daily average temperature is 75°F (average across the whole day) and the water temperature is 45°F, then I would expect the water to gain around 5°F. If you have 80 gallons of water, that is just under 670 lbs of water, which would require 3350 BTU over the whole day to cool. Your chiller won't be 100% efficient since water flowing through the tubing/pump/filter/chiller will gain heat. My 1/4 HP chiller is rated 3010 BTU/hr, and I am getting around 2600 BTU/hr. The Aqua Active 1/10 HP chiller is rated 1020 BTU/hr. With a similar ~400 BTU/hr loss in efficiency, you'd still get 600 BTU/hr, which should technically be enough. However, based on a few real-world failed cases (see note in the previous paragraph), I don't recommend choosing the 1/10 HP unit unless you're willing to risk it.
Winterization
If your plunge is in an area that freezes, you'll need to consider what you'll do over the winter. What you need to avoid is standing water in sub-freezing temperatures. If the water is moving (and the plunge stays above freezing), you're fine. You will certainly want to disconnect the chiller, because frozen water within the chiller might break it. I plan to flesh this section out more soon, but in short, there's three options that seem popular:
Drain it and take a break
This is good if you don't want to think about it, and mostly care about cold plunging when it's warmer.
Remove the chiller
Using the Union Straight Connectors, above, you can pretty easily make it so that the pump and filter stay connected, but the chiller can be removed. Disconnect the chiller so that you keep the most expensive component safe (and store it somewhere inside), then make sure the pump runs continually. Keep an eye on your temperatures to make sure the plunge water stays above freezing. If you're using it regularly, you may find that the water stays above freezing without any warming. If it is getting close to freezing, add warm water or use an immersion water heater to add a bit of heat (take it out before you use the plunge!).
Skip filtering entirely
If you can fairly easily drain your plunge and don't mind replacing the water more often, it may be easiest to keep it filled, but disconnect all the tubing. You'll want an on/off switch installed on your inlet and outlet. Then, as above, you'll just want to make sure the basin water stays above freezing, and making adjustments as needed.
Insulated coolers vs inflatable basin temperature test
If you poke around, you'll find many companies selling inflatable basins made from high-quality material (similar to white water rafts). These have some immediate advantages: because they're deflatable, they ship more easily, and are more mobile if you ever need to move them. They're significantly cheaper than very large coolers, as well.
However, as we've discovered, insulation really matters. Most DIY builds don't consider insulation seriously enough, and this can increase your total cost significantly due to higher energy use.
The inflatable basins do not have any extra internal insulation beyond the air gap between the layer. How important is this? The kind folks at Nordik Recovery sent me their basin for me to run temperature experiments on. They didn't pay me and didn't review this test before I published.
Across July to September in Colorado, I collected real-time temperature changes in both the Nordik Recovery and my Grizzly cooler DIY build. For 8 cycles each, separated by at least a week (to be exposed to different weather), I let each warm up throughout the day. Then, I ran both coolers at the same time to return the water to 45°F.
This is not perfect, because there's a lot of variables that this doesn't capture. While each basin was away from sunlight in my covered shed, and I imagine their black color may warm up more in the sun. Likewise, the weather varied significantly during this window, from highs in the mid 90°Fs to lows in the low 50°Fs. This attempts to average across all of that and capture an overall expectation for how well a ready-made product like theirs compares to a cooler-based build.
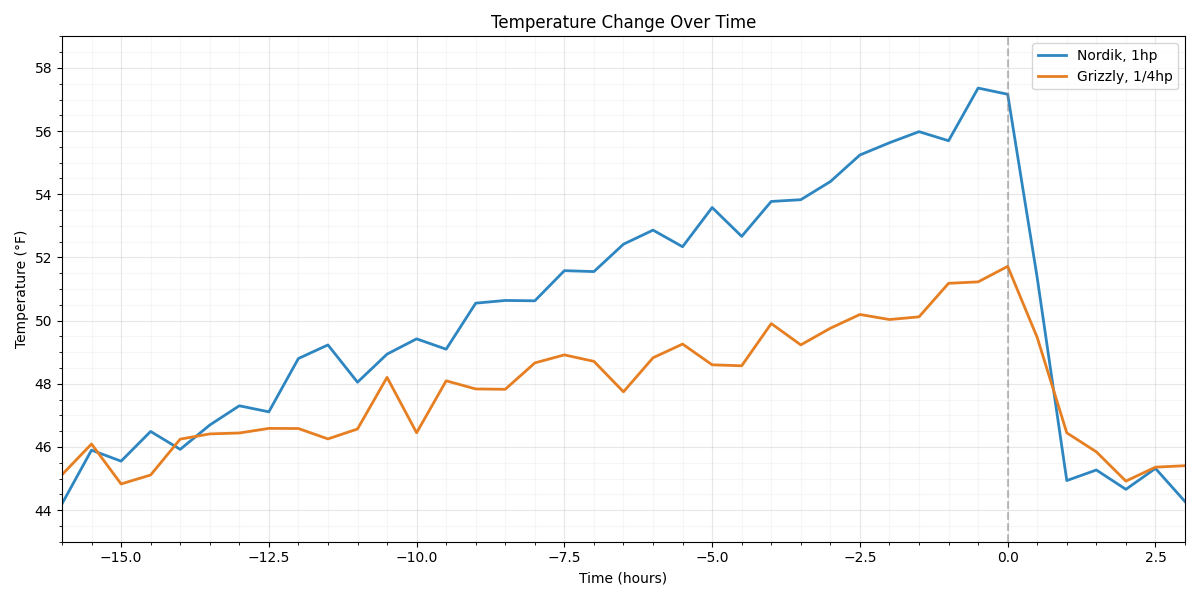
Over the 8 testing cycles, the Grizzly cooler gained an average of 6.5°F throughout the day, while the Nordik Recovery gained about 12.5°F. Indeed, insulation matters! The Nordik also had a much more powerful cooler (1hp vs 1/4hp), and not surprisingly was able to return the water back to our 45°F target faster, even though it had more heat to pump out. In fact, a slightly smaller chiller would have probably worked, seeing how effective this was.
What's the takeaway? Inflated basins may be a perfect tradeoff for many of you. You take some longevity risk (holes that may need to be repaired) and will pay more for energy. However, the benefits are pretty appealing: your up-front cost is a good bit lower, you can get a warranty to cover the entire cold plunge, and you have minimal labor. And, the energy increase isn't massive, as it would be with a uninsulated stock tank.
If that looks like a good tradeoff, consider an inflatable basin with compatible chiller and filtering system. They sell the basin by itself, but then you're back to solving chilling. The Nordik Recovery Premium bundle includes all of this, and would be my overall recommendation for this route. With a few DIY plumbing parts, you could also attach a housing + filter to their Standard bundle to have filtering (or just replace the water often).
Next steps
Since having completed the cold plunge, I've used it almost every day. The lack of overhead—in and out in a few minutes—makes it so easy to use frequently. Next, I plan on building a wooden enclosure for the pump, filter, and chiller since my setup is mostly outside (in an open shed). If you'd like updates on how my setup is working, leave your email address below and I'll provide updates as I improve things over time. Feel free to reach out if you have any build-related questions.
Several of the Amazon links here are affiliate links. All proceeds get donated to local charities near me. I would link to Amazon either way, as their prices for these items are consistently good, but feel free to shop around. They want me to tell you "As an Amazon Associate, I earn from qualifying purchases".